Try TixGear: The Ultimate step-by-step tutorial to learn how to create an event and sell tickets using TixGear event management and ticketing platform.
TixGear is one of today's fastest-growing event managment and ticketing platforms. It houses events of all shapes and sizes. TixGear software is a sophisticated, yet easy-to-use network ecosystem for the entertainment
industry. TixGear uses a platform business model and creates community and markets with network effects.
TixGear has a test environment (TEST ZONE) that's completely separated from the production one (REAL ZONE). Let's get started with creation event in the TixGear TEST ZONE:
Prague, Imperial Theatre
A Midsummer Night's Dream
William Shakespeare
A magical play replete with motifs, entanglements and mysteries, which true theatre-goers must see at least once in their lifetime.
Desktop applications of the TixGear platform (download) are implemented in Java and run on the operating systems of the Windows, Mac OS, Linux, Solaris families. Java applications need
Java Runtime Environment (JRE). When JRE is installed, files with the extension
".jar" run as regular executables.
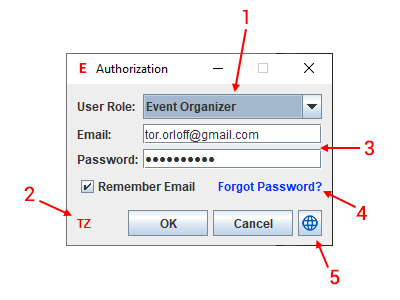
Download and run TixGear Editor App to create The Midsummer Night's Dream event. Dialog window is shown after app start up:
1. Choose User Role: Event Organizer
2. Turn on TEST ZONE indicator (TZ) by pressing ALT-Z or mouse clicking on indicator’s area.
3. Use your email and password to log in.
4. If you forgot your password click this label.
5. Click this button to change app locale.
If authorization is successful, you’ll see TixGear Editor’s main window:
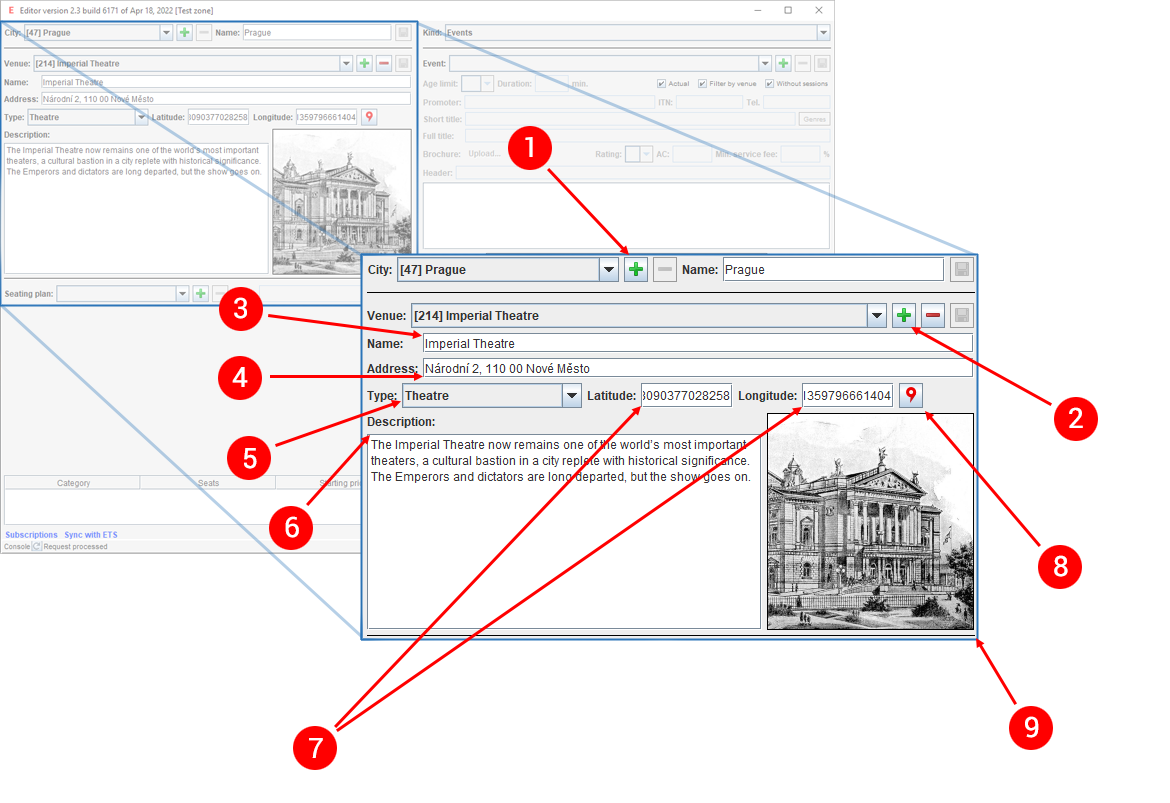
In the Event location panel, you can add city, currency, time zone and venue with address, type and geo coordinates. To do this, Operator account credentials is needed.
Organizer or Agent does not have a permission to add event location. You may skip this step if you haven't Operator account and ask [email protected] to create cities and venues for you.
1. Press button to add a city where venues are located. Hereinafter, such components consist of Combоbox, Text field, Add button, Delete button
and Save changes button. Аfter pressing button "Add city..." window is shown:
Set appropriate values for Name, Time zone and Currency and press OK. Please note that in case of Czech Republic you may use EUR and CZK, so it could be configured later.
2. Аfter pressing button "Add venue..." window is shown:
Enter the venue name (Imperial Theatre) and press OK.
3. The Venue name is shown in the Text field.
4. Enter the venue address (Národní 2, 110 00 Nové Město), and you’ll see a red border on Venue combobox and active Save changes button:
You can edit data in Text fields at any time and then press (Save changes) button.
5. Choose appropriate venue Type (Theatre).
6. Add venue description. Some HTML tags are allowed.
7. Add venue geo coordinates: latitude (50.08090377028258) and longitude (14.41359796661404). To do that, use Google maps.
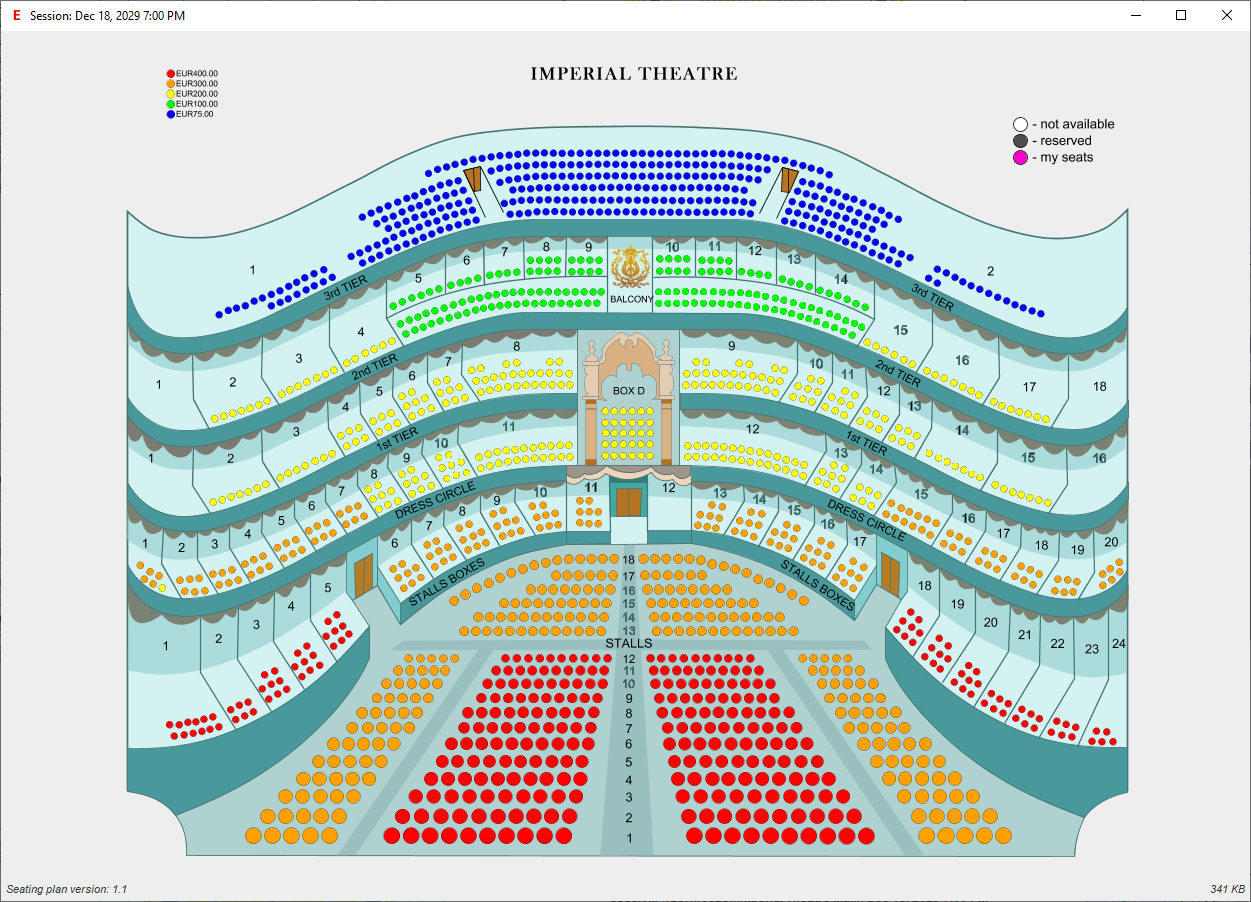
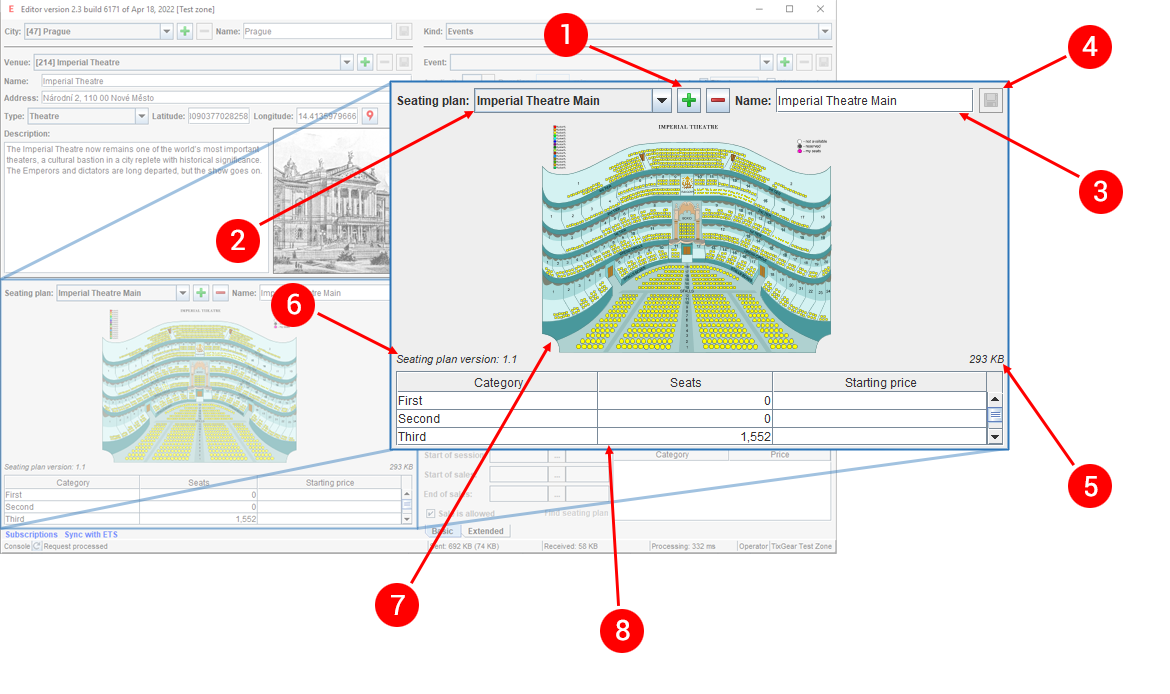
In the Seating plan panel you can upload one or more seating plans for the venue. Detailed seating plan with assigned seats is created using INKSCAPE or similar SVG Editor.
You can download prepared Imperial Theatre seating plan in TixGear One SVG format and add it to TixGear.
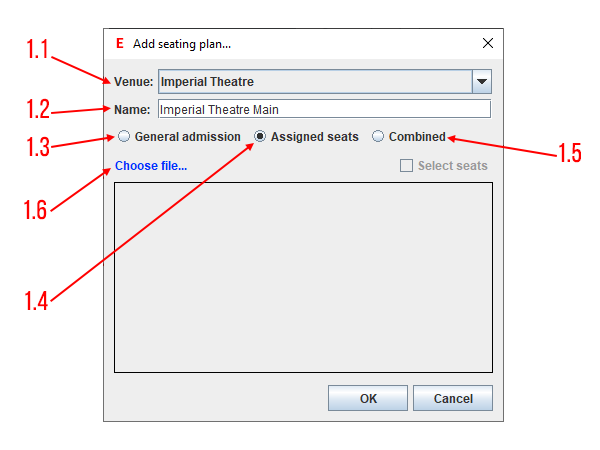
1. Press button to add a new seating plan to TixGear. "Add seating plan..." window is shown:
1.1 Venue Name comboboх.
1.2 You have to fill in the Seating plan name text field.
There are three seating plan types can be used in TixGear: assigned seats, general admission, and combined seating plans.
1.3 If event and venue imply attendance with no specific seats, then you should check “General admission” radio button.
1.4 If seating plan implies that viewers have to be on specific seats, then “Assigned seats” radio button should be active. In this case
you have to choose seating plan file in TixGear One SVG format, prepared accordingly to this article.
1.5 If event has tickets for both assigned seats and general admission (e.g. dancefloor tickets, which are for standing (or dancing) only, and VIP seats tickets)
then “Combined” seating plan should be chosen.
1.6 Activate “Assigned seats” radio button, press "Choose file..." and pick up the file "it.svg".
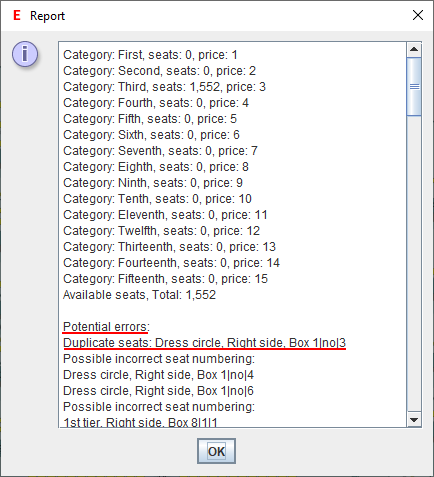
TixGear Editor performs a lot of checks while inspecting the seating plan. The result of these checks is shown in Report window:
Pay attention to ”Potential errors: Duplicate seats: Dress circle, Right side, Box 1|no|3”. It means that two seats have the same coordinates:
sector name = Dress circle, Right side, Box 1
row number = no
seat number = 3
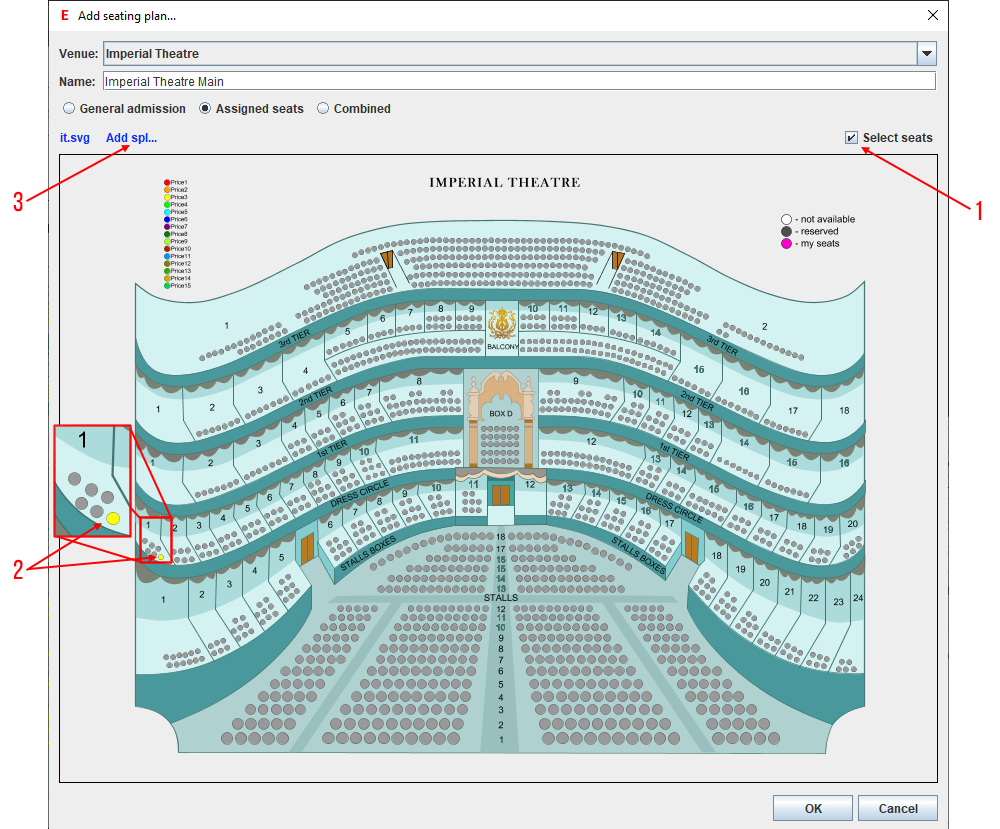
You can find these seats on the seating plan using “Select seats” checkbox:
1. All unmistakable seats are colored grey by checking “Select seats” checkbox.
2. Seats with potential errors are shown in its true color (yellow). In this case, it's duplicate seat: Dress circle, Right side, Box 1|no|3.
That's easily fixable at Inkscape (see TixGear One SVG)
3. You can add seating plan in SPL format, used by CTS Eventim.
When the seating plan is successfully loaded, it's shown in the Editor app:
1. Add seating plan button.
2. Seating plan name comboboх.
3. Seating plan name text field.
4. Save changes button.
5. Seating plan size.
6. Seating plan version.
7. Seating plan SVG image, use mouse scroll to zoom in and out.
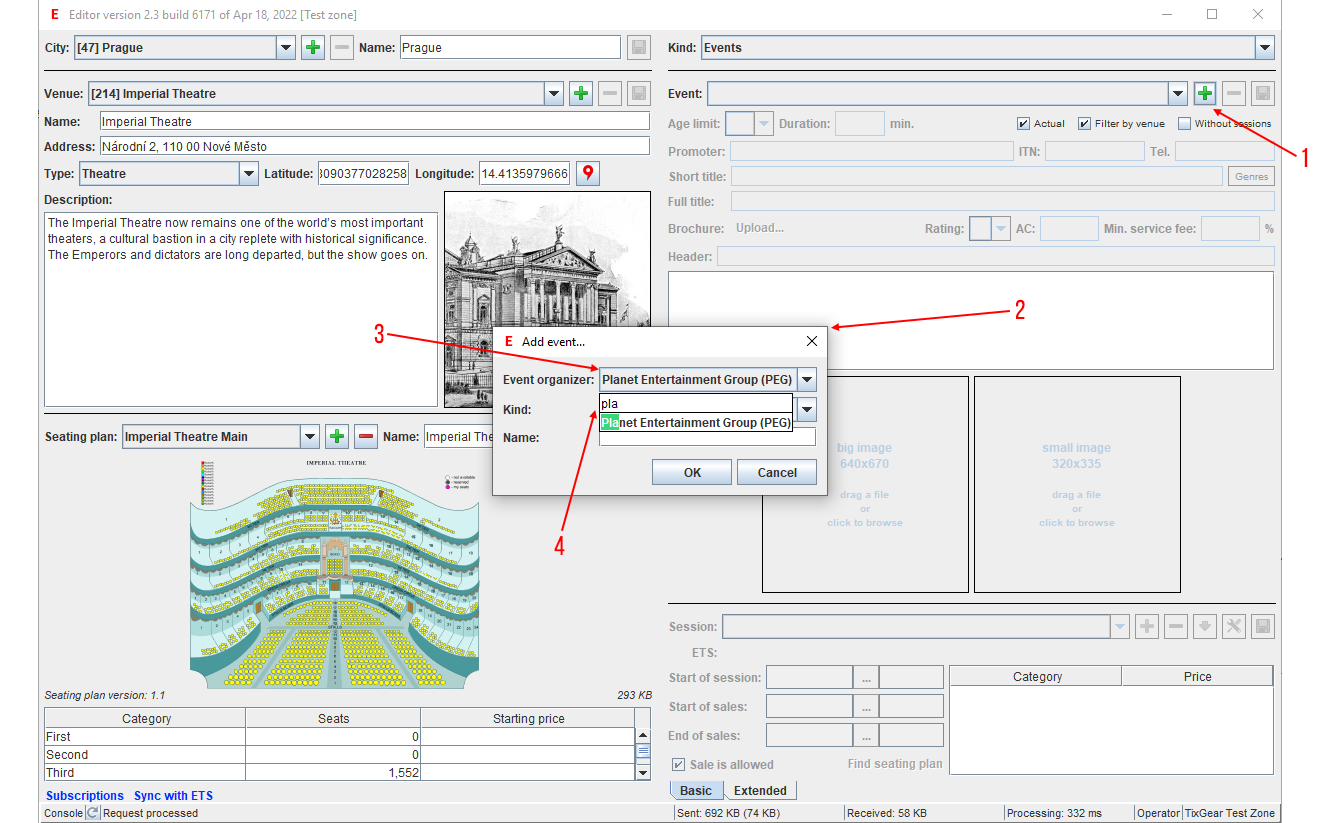
Press button (1) to add a new event. "Add event..." window is shown (2):
Choose your Business Name as Event organizer, e.g. Planet Entertainment Group (3). All TixGear app comboboxes are searchable. You can start typing “pla”(4)
when it has focus and the matching entry is selected as you type.
Choose ”Kind” of Event - "Events", and enter the Name (Short title) of event - "A Midsummer Night's Dream", and press OK. Then event will be added to TixGear.
Here you can enter event basic info, images and details:
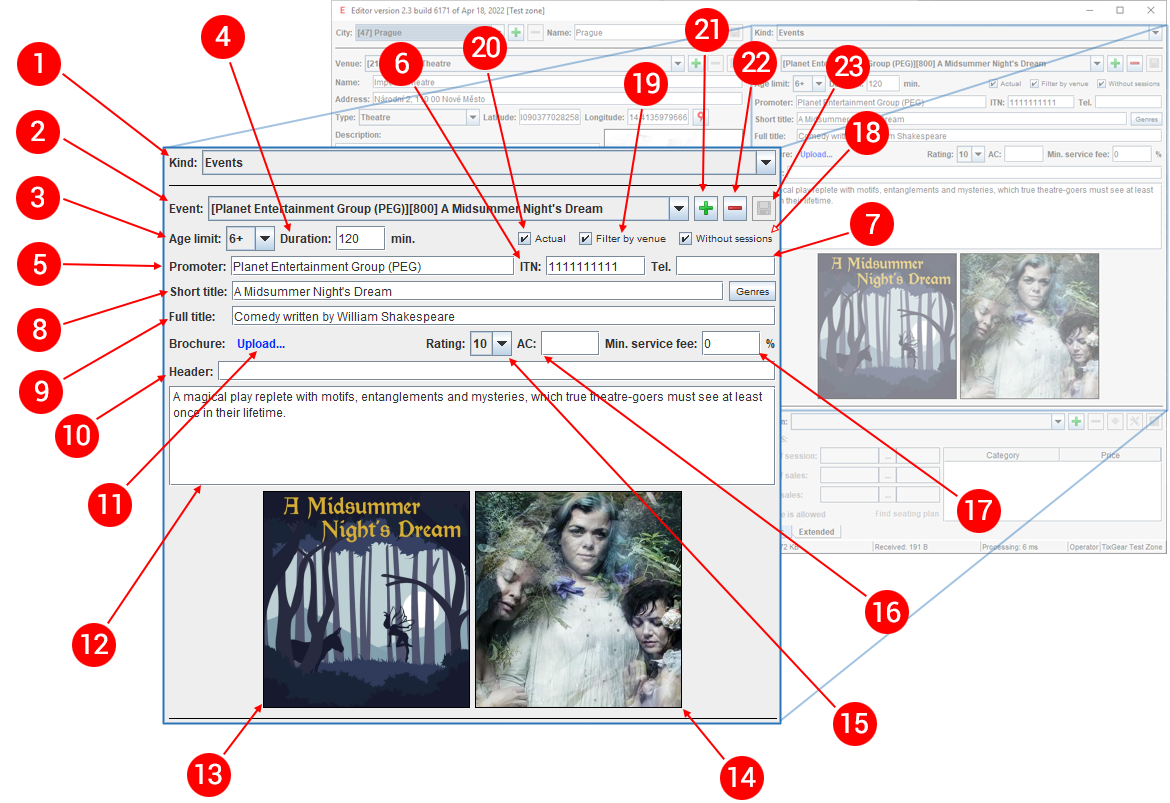
1. “Kind” combobox is used to set a "kind-filter" for Event combobox (2).
2. Selection of event via combobox. If any event data was changed and not saved, combobox will have red edging.
3. Setting the age restriction according to law. This is a required parameter.
4. Field to enter event duration in minutes.
5. Field for Promoter Business Name. Promoter is either individual or entity with the rights to host and run an event. In TixGear platform Promoter can be different than Event organizer, even though most of the time this is the same individual/entity.
Entering Promoter data is required and this data is placed on tickets. This data includes ITN (6) and phone number (7).
6. Promoter’s ITN (Individual Taxpayer identification Number) is added in Editor and to tickets so customers are aware, which entity or individual is an event Promoter.
7. Promoter phone number is added in Editor and to tickets so customers can always contact event Promoter.
8. Short title is the basic event name. Give your event a clear title. In any case, title can’t be longer than 40 symbols including spaces. Short title can’t be identical to Full title (9).
9. Full title (event’s name) or short annotation.
10. Description header, which is usually displayed on the screen with event’s description (12).
11. You can upload a brochure with information about the event in PDF (e.g. like this). Brochure’s size can’t exceed 5 Mb.
12. Event description (up to 4kb).
13. Big image (poster) for the event (640x670 pix). It is recommended that small and big images are different and clear.
14. Small image (poster) for the event (320x335 pix).
15. Set rating of "A Midsummer Night's Dream" to 10. Top rated events are shown first.
16. Access code allows limiting access to event and all its sessions.
17. Minimal service fee is set by Organizer for all of Agents.
18. If “Without sessions” checkbox is active, event selection combobox (2) will also have events with no sessions displayed. Most of the time these are events which are in the process of creation in TixGear.
To exclude these events from combobox, checkbox should be deactivated.
19. With the “Filter by venue” checkbox active only events with sessions available in venue selected in Event location panel will appear in Event combobox (2). If checkbox is inactive, then all events are shown.
20. With the “Actual” checkbox active, only events with running ticket sales will be loaded into Editor. All events will be loaded if the checkbox is inactive.
21. “Add event” button. After pushing this button, window “Add event…” pops up.
22. “Delete event” button. Only events with no sessions created can be deleted.
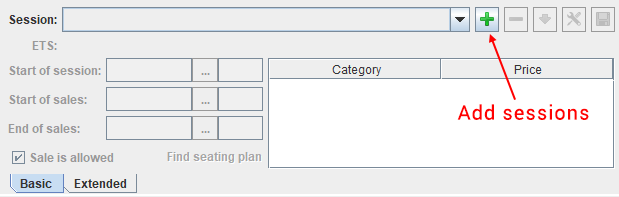
In the Sessions panel you can add new sessions of the Event:
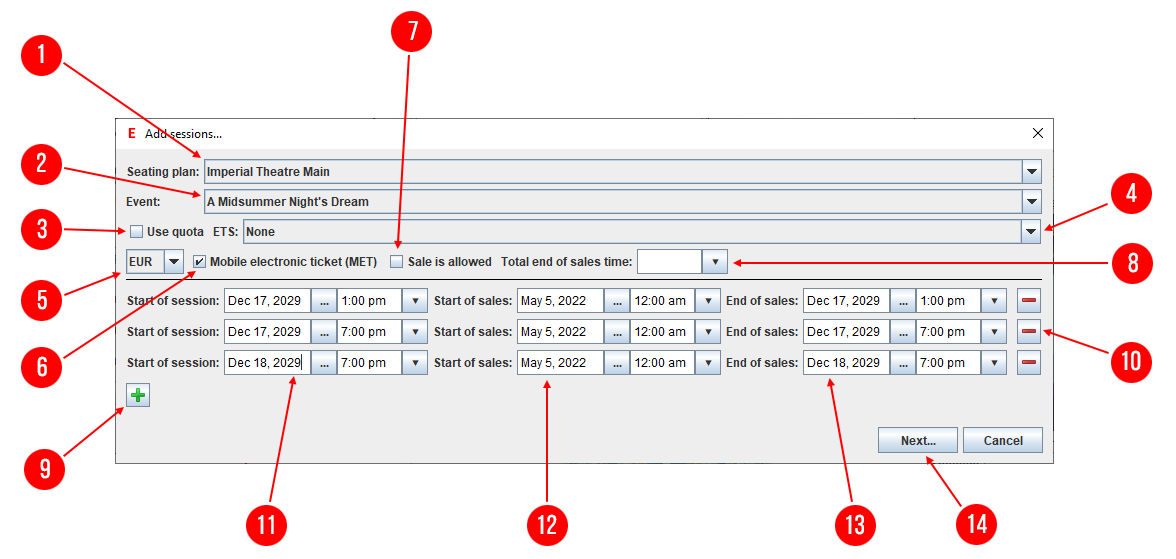
Press "Add sessions" button to add new sessions. "Add sessions..." window is shown:
1. Session seating plan choice: Seating plan, opened in the Seating plan panel is chosen by default.
2. Event combobox. Event, opened in the Event info panel, is chosen by default.
3. “TAS” checkbox turns on and off the Ticket Allocation Sales (TAS) mode.
4. "ETS" combobox is used to choose an available connection to External Ticketing System or Third-party Inventory (TPI, e.g. Ticketmaster, Eventbrite) or "None".
Choose "None" for this case.
5. Set up a currency (Euro) for adding sessions.
6. "Mobile Electronic Ticket (MET)" checkbox. If it's active, then session attending is available via Mobile electronic ticket (MET) shown on mobile device screen.
7. “Sale is allowed” checkbox turns on and off ticket sales on added sessions. Checkbox is inactive at this step because after creating sessions might have to be done some additional settings
with ticket sales turned off.
8. Total end of sales time (no day, only time) in the previous day for all added sessions. Example of using this parameter: in order to meet the restrictions of social distancing during COVID-19 pandemic,
visitor access to the museum is organized by selling tickets to sessions starting every 20 minutes. For example, these are sessions on August 5. Museum administration is required to have ticket sales on
these sessions end on August 4, and that there would be no opportunity to buy an entrance ticket on the August 5.
9. Press button to add a new session.
10. Button of deleting session from the list of being added.
11. Date and time of session start.
12. Date and time of ticket sales start. Beginning of the current day is set by default.
13. Date and time of ticket sales end. By default, ticket sales end at the moment of session start. If necessary, end of sales can be set later than the start of the session.
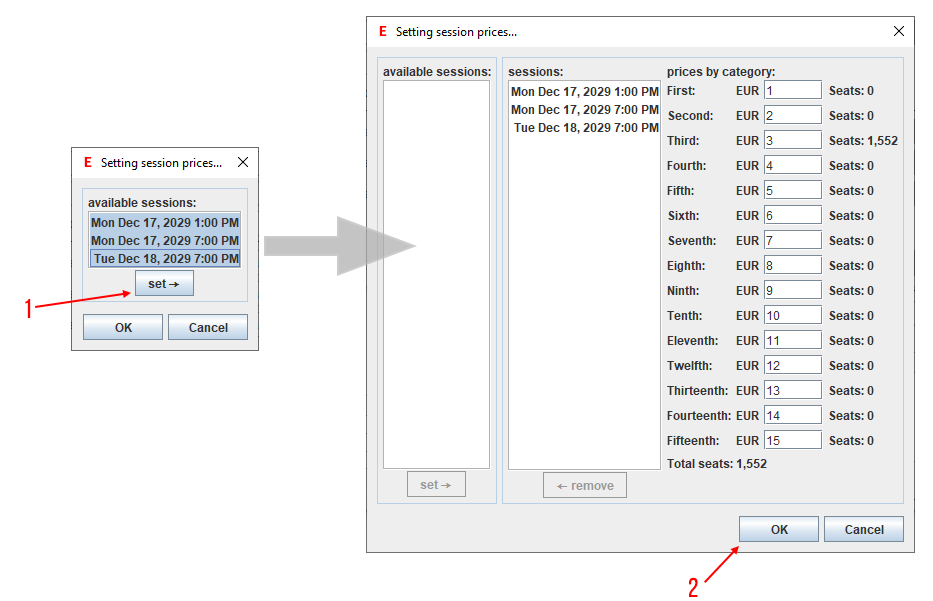
You can set the prices for sessions here or this step may be skipped and prices will be set later, in “Manage seats” window.
1. Press button.
2. Press OK button.
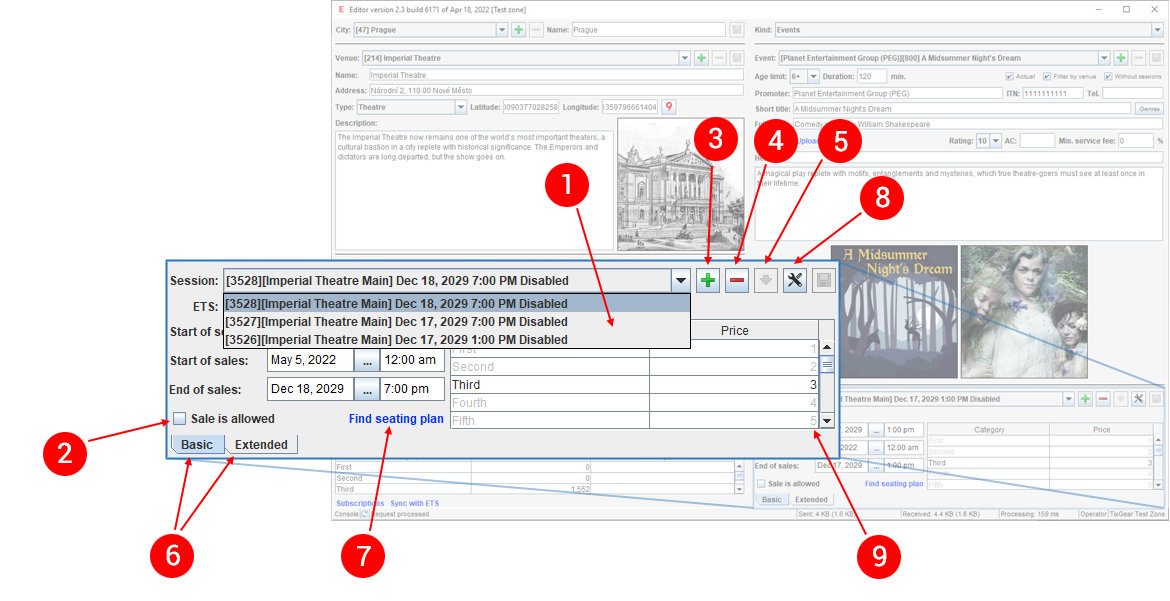
Now, there are three sessions:
1. A Midsummer Night's Dream sessions are displayed in “Session” combobox. The first line contains the uniq ID of session (3528), the name of seating plan (Imperial Theatre Main),
date and time (Dec 18, 7:00 PM), status (Disabled) means that sales is not allowed (2).
2. “Sale is allowed” checkbox turns on and off ticket sales on the session.
3. "Add sessions" button
4. "Delete session" button. Session could be deleted if there are no ticket sales.
5. Load archival session. Half a year from the date of session start, a session becomes archived, with no opportunity to refund tickets. But you can load archival sessions for some reasons.
6. Basic and Extended session settings tabs. Basic tab contains session start time, time of ticket sales start and end, “Sale is allowed” checkbox and Price categories table.
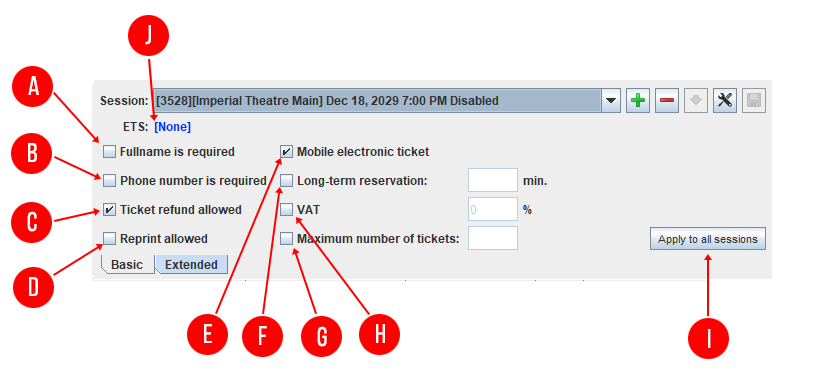
Extended tab contains the following options:
A. With “Fullname is required” checkbox active, user will be asked for a full name when buying tickets.
B. With "Phone number is required" checkbox active, user will be asked for a phone number when buying tickets.
C. With "Ticket refund allowed" checkbox active, agents can refund tickets sold for this session.
D. With "Reprint allowed" checkbox active, agents can reprint tickets sold for this session.
E. With "Mobile Electronic Ticket" checkbox active, attendees can show tickets to stewards using their mobile devices.
F. Permission to Long-term Reservation (LR) of tickets and its setting. Event organizer sets LR and its value in minutes.
How long is a reservation valid?
- If an order is created without LR, then order expiration time is the minimal of default TixGear order lifetime and Third-Party Inventory (TPI) order lifetime
- If an order is created with LR, then order expiration time is the minimal of LR setting and TPI order lifetime
G. You can limit maximum number of tickets per order.
H. VAT Setting
I. Apply current settings to all sessions of the event.
J. External Ticketing System (ETS) is the same thing that Third-Party Inventory (TPI). Here you will find the information about the connection to ETS.
7. After clicking on "Find seating plan" session's seating plan is shown on the left side of Editor.
8. Аfter pressing this button "Manage seats" window is shown.
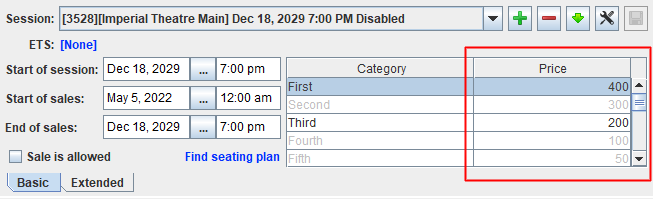
9. Price categories table. Price category name and price can be changed by double-click, changes can be saved by “Save” button.
Let's set prices for the session of Dec 18, 2029 7:00 PM. Choose this session and double-click on appropriate cell in Price categories table (9). Enter prices for five categories:
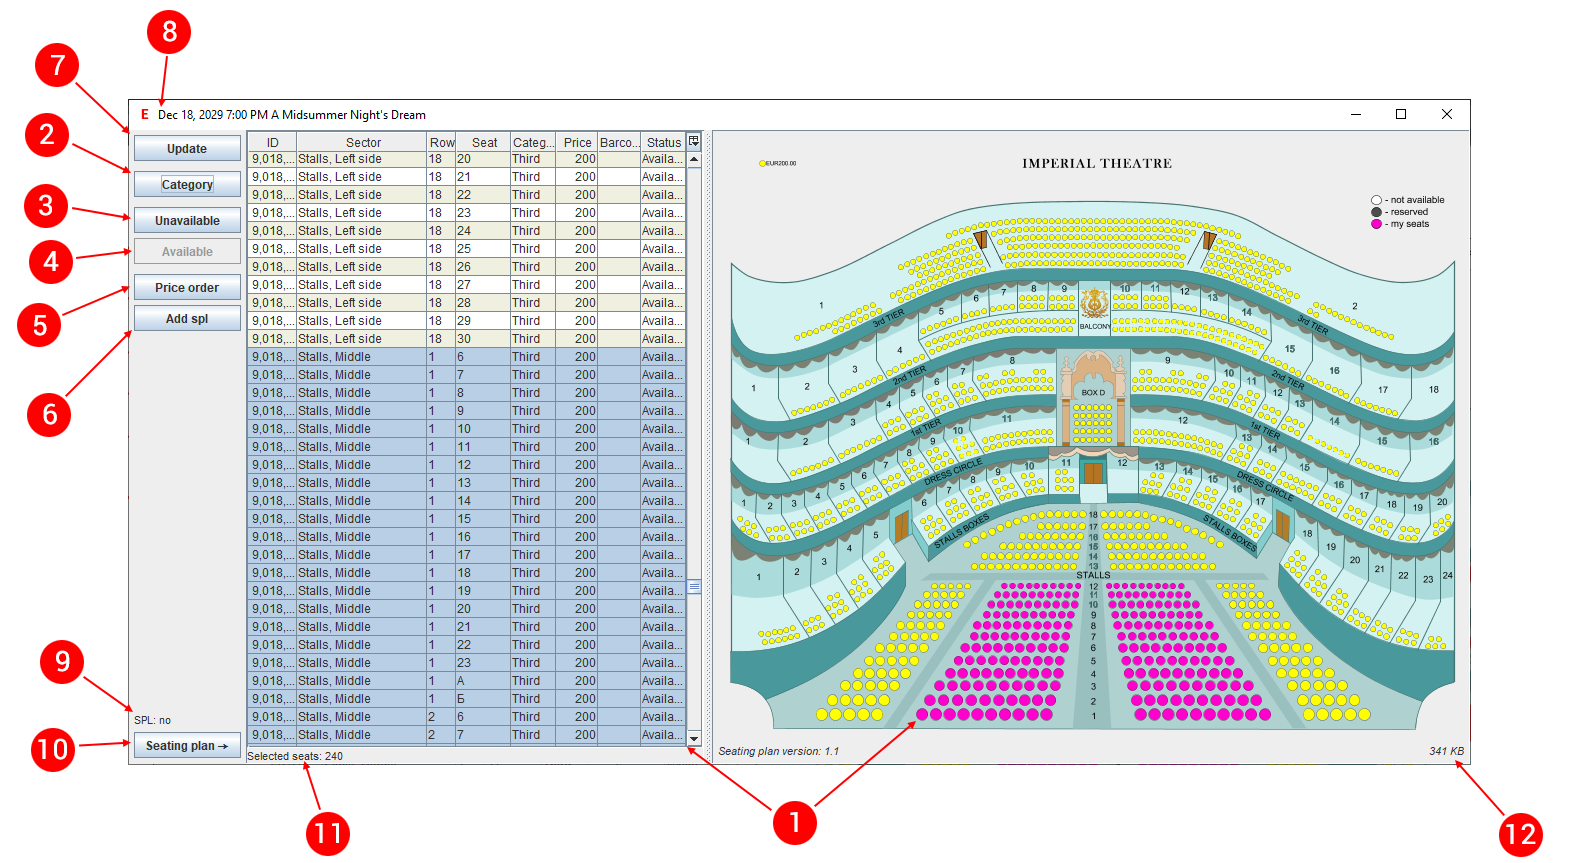
Let’s assign categories to seats. Press button to open Manage seats window:
1. Selected seats. You can select seats on the seating plan or select rows in the table, selection apply to these seats in both elements.
Keys combinations are used for selecting:
Left-click – selection of a seat
SHIFT + Left-click- selection of a row
ALT + Left-click – selection of a sector
CTRL + one of the above – adding to selection another sector/row/seat or removing selection from already selected ones.
2. Press Category button to assign Price Category to selected seats.
3. Press Unavailable button to set selected seats status to unavailable.
4. Press Available button to set selected seats status to available.
5. Press Price Order button to change order of prices displayed on seating plan.
6. Add seating plan in SPL format (Eventim).
7. Press Update button to update the session data.
8. Session header.
9. SPL indicator.
10. This button splits Manage Seats window to Table and Seating plan windows and vice versa.

 button to add a city where venues are located. Hereinafter, such components consist of Combоbox, Text field, Add button, Delete button
and Save changes button. Аfter pressing
button to add a city where venues are located. Hereinafter, such components consist of Combоbox, Text field, Add button, Delete button
and Save changes button. Аfter pressing 


 (Save changes) button.
 button.
 button to open Manage seats window: