BIL24 PLATFORM EDITOR APP
User's Guide
![]()
BIL24 PLATFORM EDITOR APP
User's Guide
APPLICATION MAIN WINDOW
ADDING SEATING PLAN
ASSIGNED SEATS
GENERAL ADMISSION
COMBINED SEATING PLAN
ADDING SESSIONS
TICKET SALES ORGANIZATION
MANAGING SEATS
WORKING WITH EXTERNAL TICKETING SYSTEMS (ETS)
SUBSCRIPTIONS
MOBILE ELECTRONIC TICKET
CONSOLE USAGE
Editor, just like other BIL24 applications, is a client’s part of the ticketing system’s central server. Editor is intended to create events (sessions) and input all necessary information for sales into central database of BIL24.
Editor provides tools for creating and managing event’s sessions, includes tools for connecting to events provided by External ticket systems (ETS), and tools for managing ticket sales. For a better Editor learning experience,
it is recommended to firstly fully read this section (Application Main Window) and then use the intuitive interface, looking into documentation only of necessity.
The most important restriction of 2.1 build is that adding and changing data in an Editor copy changes it both in this copy and in the platform’s central database. No changes happen in other running Editor copies.
Next builds of an application will have global data update for all running copies gradually implemented. If you have to get latest data from central server (changes, done through other Editor copies),
you have to use “Refresh” button (figure 1, p.42).
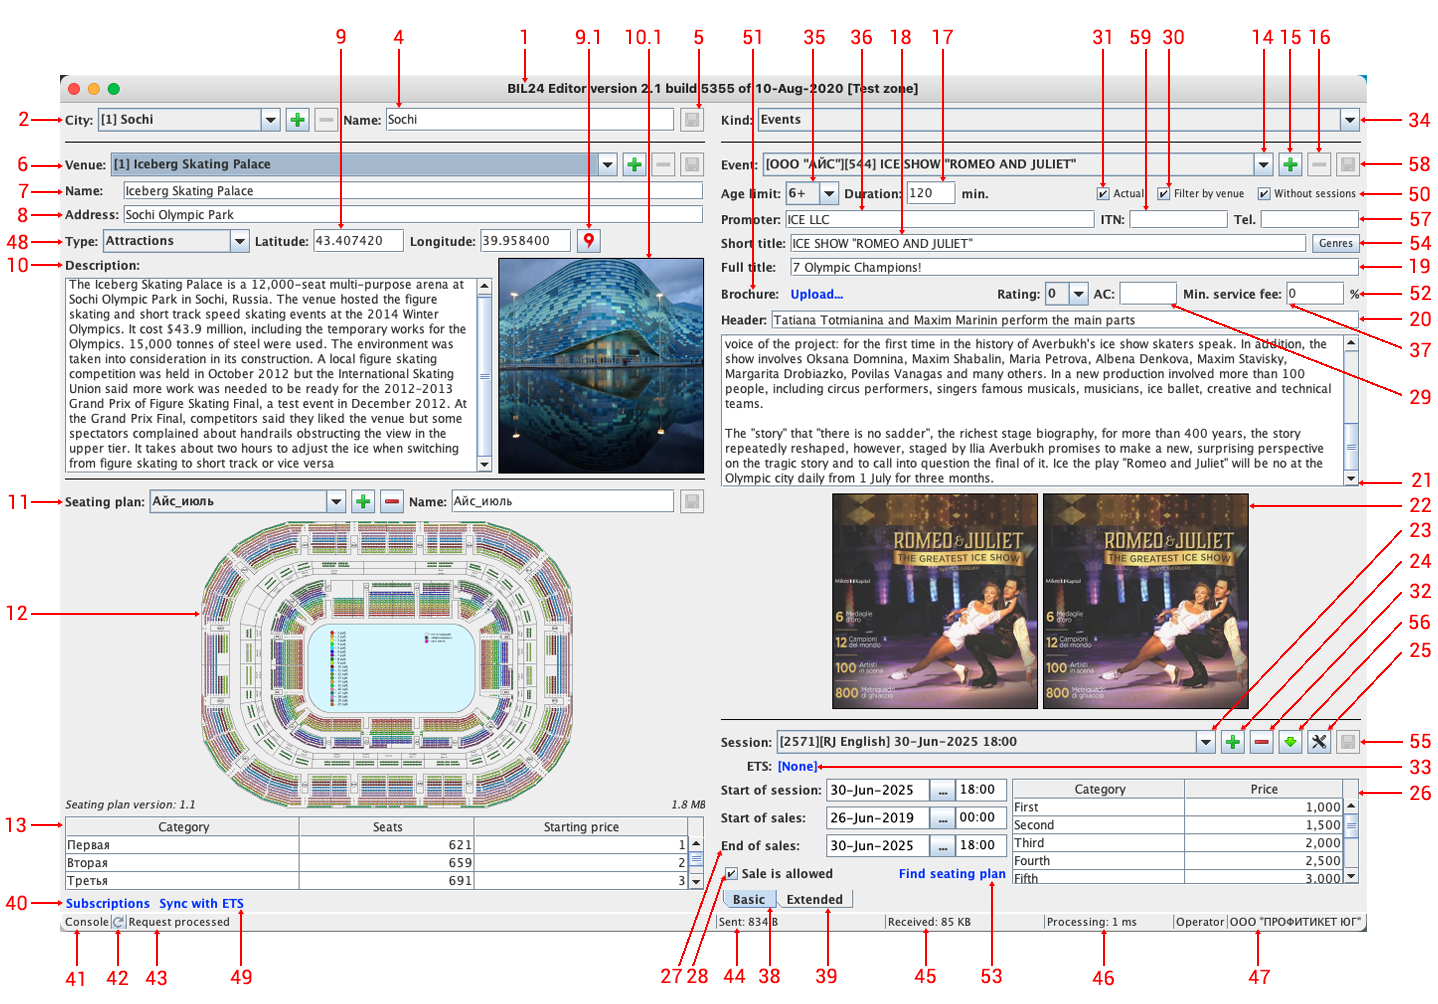
figure 1
1. In window’s header there is an actual build of the Editor and name of zone it is currently connected to (Test or Real).
Test zone is intended to check changes in ticketing system software code and also for testing user actions. Real zone is used by customers and tests there are limited.
2. Selection of cities, where venues are located, via combobox. Hereinafter identifiers (ID) of corresponding objects are presented in square brackets. All identifiers are unique in the whole platform scale.
3. "+" Button is used for adding a new city. When adding the city (figure 1.1.) it is necessary to choose an appropriate to it time zone. Time of event’s start, start and end of sales are all shown in local time zone.
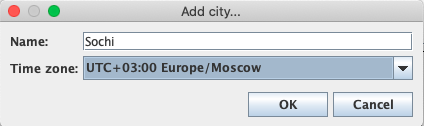
figure 1.1
4. Text field for editing the city name.
5. “Save” Button. Hereinafter some interface elements are grouped in lines, consisting of object name, combobox for choosing specific object, adding and deleting buttons, and a text field for editing the object name. This line is for one object.
When changing an object, the edging of the combobox becomes red. This is removed when changes are saved in central database via “Save” button.
Delete button (-) is only available for objects not connected to created sessions or sessions with tickets sold.
6. Selection of venues via combobox. “+” and “-“ buttons for adding/deleting venues are placed in the right, just as “Save” button. When the “Filter by venue” checkbox is checked, choice in this combobox influences data in “Event” combobox. (14).
7. Text field for editing venue name.
8. Text field for editing venue address.
9. Venue coordinates and the button for checking coordinates (p. 9.1). Services maps.yandex.ru and maps.google.com can be used for getting coordinates, where you can enter venue address and, after receiving latitude and longitude, copy them into respective fields
9.1 Button for checking coordinates (latitude and longitude) on Google Maps.
10. Venue description.
10.1 Image with inside or outside view of the venue. Image in 640x670 resolution can either be placed via drag’n’drop or by clicking image section (“Choose file” window would open). Image resolution in the Editor (640x670, 320x335) are chosen this way in order for proper display of them in mobile app disregard differences in screen resolutions.
11. Selection of seating plan via combobox. To add seating plan, simply use “+” button, which will lead to opening of the window “Add seating plan…”. This window is explained more in Adding seating plan section.
12. Seating plan is shown to customers for more visual and comfortable selection of seats. Displayed seating plan influences "Adding session…"window appearing by pressing “+” button in “Session…” line. It is important to carefully track this process, in order not to add session with seating plan to event which doesn’t occur in this venue.
Also you have to remember that the same event can run at different venues in different cities. Seating plan can be enlarged and reduced in size by mouse wheel. Seating plan can also be moved by holding left mouse button, while pushing middle mouse button returns it to default place. Bottom left corner of plan contains its version, and bottom right holds its size.
By moving cursor to seat, seat’s coordinates are shown: sector name, row number and seat number.
13. Price categories and number of seats there. This data is received from seating plan with assigned seats or is entered manually for venues and events, where viewers don’t have assigned seats (general admission or combined seating plan). Data in spreadsheet is open for editing.
14. Selection of event via combobox. If any event data was changed and not saved, combobox will have red edging.
15. “Add event” button. After pushing this button, window “Add event…” pops up. Users with Operator role have to choose Event organizer of event (figure 1.2). Users with Event organizer role already have necessary selection made. Hereinafter in documentation Editor options for users with Operator role (max rights) are described.
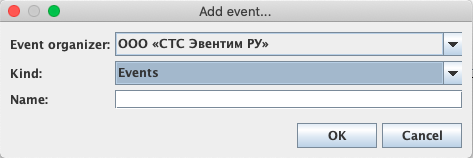
figure 1.2
16. “Delete event” button. Only events with no sessions created can be deleted. (23).
17. Field to enter event duration in minutes.
18. Short event’s name. In any case, name can’t be longer than 40 symbols including spaces. Short name can’t be identical to full name.(section 19)
19. Full event’s name or short annotation.
20. Description header, which is displayed on the screen with event’s info.
21. Event description (up to 4kb).
22. Images (posters) for the event. Small image 320x355 is displayed on event choosing screen. Large image 640x670 is displayed on a screen with detailed event’s info.
Large image can be stretched to full screen in mobile apps. It is recommended that small and large images are different.
Poster requirements.
23. Session selection via combobox. Each event can have a variety of sessions running at different venues in different cities. More about this in Adding sessions section.
24. “Add session” button. After pushing it, "Add sessions..." window pops up. Work with this window is described in Adding sessions.
25. “Seats management” button opens same titled window. Its possibilities are described in Managing seats.
26. Session price categories spreadsheet. Price category name and price can be changed by double-click, changes can be saved by “Save” button.
27. Time of session start and also time of start/end of ticket sales to it.
28. Checkbox “Sales allowed” is an element which controls ticket sales. If it is active, then tickets to session selected in combobox are available to purchase.
29. Rating can be applied to any event. Default rating is 0. Website and mobile app only show ratings of “9” and “10”. The higher the rating of an event is, the higher it is displayed among other events. Events with the same rating are sorted by date increasing.
30. With the “Filter by venue” checkbox active only events with sessions available in venue selected in p.6 will appear in venue choice combobox (14). If checkbox is inactive, then all events are shown.
31. With the “Actual” checkbox active, only events with running ticket sales will be loaded into Editor. All events will be loaded if the checkbox is inactive.
32.“Delete session” button. Session will be deleted only if there are no tickets sold to this session.
33. Line with session data and data of connecting to External Ticket System (ETS). It is critically important that session in BIL24 has correct Connection to ETS connected and correct session in external system.
More details about creating sessions based on external ticket systems are in Working with external ticketing systems (ETS). section. Line contains ID and the name of Connection to ETS. Clicking the line opens seating plan with actual information about seats available for purchase in browser.
This is the moment when info about seats is received from ETS.
34. “Kind” combobox is used to set filter for Event combobox (14).
35. Setting the age restriction according to law. This is a required parameter.
36. Field to enter Promoter. Promoter is either individual or entity with the rights to run an event. In BIL24 platform Promoter can be different than Event organizer, even though most of the time this is the same individual/entity. Entering Promoter data is required and this data is placed on tickets.
This data includes ITN and phone number (p. 59, 57).
37. Access Code. Code is used in ticket sales frontends (websites, mobile apps) in order to restrict ticket purchasing access.
38. Basic session settings tab, which includes session start time, time of ticket sales start and end, and “Sales available” checkbox.
39. ВAdvanced session settings tab (figure 1а).
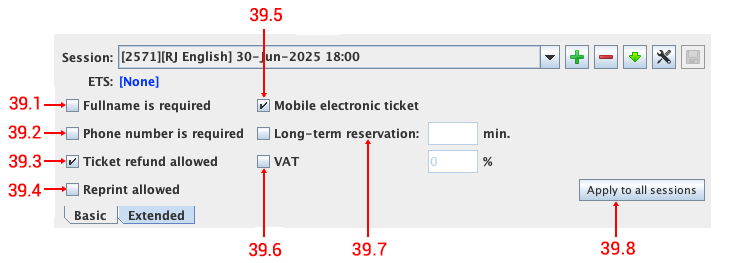
figure 1a
39.1.Checkbox for is it required to receive full name from a customer. If checkbox is active, then ticket sales frontends (websites, mobile apps, cashiers, widgets) will require entering of customer’s full name. Full name is typed on ticket and can be used as an additional identification.
39.2.Checkbox for is it required to receive phone number from a customer. Phone number is not printed on ticket and only is used to contact customer.
39.3. Permission for ticket refund checkbox.
39.4. Permission for ticket reprint with new data for the same seat.
39.5. Mobile Electronic Ticket (MET). Read more about this in Adding sessions, Mobile electronic ticket.
39.6 Appearance and value of value added tax (VAT). This parameter is required for some of the ticket systems and is transferred via API.
39.7 Permission to Long-term reservation (LR) and its settings. Event organizer sets in Editor appearance of LR and its value in minutes. Order lifetime calculation algorithm:
1. If an order is created without LR appearance, then order lifetime is the minimal of default BIL24 order lifetime and ETS order lifetime.
2. If an order is created with LR appearance, then order lifetime is the minimal of order lifetime set in session (p. 39.7) and ETS order lifetime.
39.8 “Apply to all sessions” button, which applies this settings to all other sessions of given performance.
40. Clicking “Subscriptions” opens a window with list of Agents and events. Agent subscribed to an event is allowed to sale tickets on it. Read more about it in Subscriptions section.
41. Editor’s console contains telemetry data and error messages. Console is opened by double-clicking. Read more about it in Console using section.
42. “Renew” button actualizes data in Editor via request to the BIL24 central server.
43. Message line for network requests’ completion current status.
44. Amount of data sent to the server in the last request (in bytes).
45. Amount of data received from the server in the last request (in bytes).
46. Time of last request processing (in ms).
47. Role and name of entity Editor user.
48. Selection of venue type via combobox. Venue type can be: Undefined, Entertainment, Excursions, Restaurants, Hotels, Sanatoriums, Museums, Galleries, Resorts. Type is transferred via BIL24 protocol (API) and used in multiple occasions, for example, on
CITYPASS project websites.
49. Pressing “Sync with ETS” summons “Synchronization with ETS” window (figure 11.9) witch the list of sessions where seats reserved are different from ones on ETS. Read more about this in Working with external ticketing systems (ETS) section.
50. With “No sessions” checkbox active, event selection combobox (14) will also have events with no sessions displayed. Most of the time these are events which are in the process of creation in BIL24. To exclude these performances from combobox, checkbox should be deactivated.
51. You can place a brocure with info about event in PDF into ticket sales frontend via “Upload” button. Brochure’s size can’t exceed 5 Mb.
52. Minimal service fee (MSF) is set by an event organizer or an operator for each event session. Minimal service fee value is set in percentage of ticket nominal cost. When ticket sale is done through agent’s frontend, MSF is compared with service fee set for this frontend or an agent.
If service fee set by an agent is less than MSF, then MSF will be forced instead.
If else, then agent’s service fee value will be used. MSF helps to avoid situations where agent works at a loss.
53. “Find plan” link chooses seating plan for the session created in the Editor (p. 11,12) main window’s left part.
54. “Genres” button allows to choose in which genres (one or more) performance can be categorized.
55.“Save session data” button.
56. Button for loading archived sessions. After 30 to 90 days from session end (period depends on current platform settings) session is archived. It remains in database, but all of non-usable information, e.g. empty seats, is removed from session object. This way neither archived session can’t be changed,
nor ticket refunds can be done, but session still contains a lot of data, required for reports. By default, archived sessions aren’t loaded into Editor on app start.
If by any reason you have to examine the data of archived session, it can be loaded via this button.
57. Promoter phone number (p. 36) is added in Editor and to tickets so customers can always contact event Promoter.
58. “Save event data” button.
59. Promoter’s ITN (p. 36) is added in Editor and to tickets so customers are aware, which entity or individual is an event Promoter.
These are three venue seating plans can be used in BIL24: assigned seats, general admission, and combined seating plans. To add a seating plan you have to press “+” button in “Seating plan” line (figure 1, p.11), which will result into “Add seating plan…” window opening (figure 4).
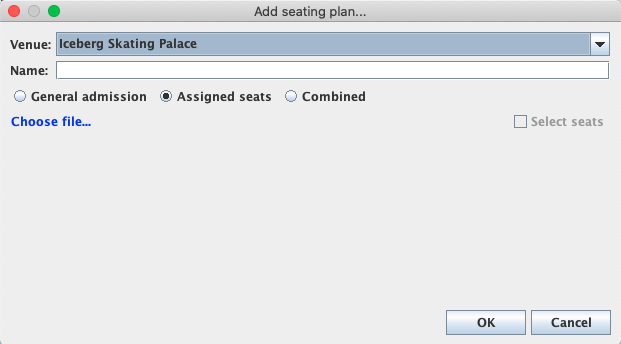
figure 4
If seating plan implies that viewers have to be on specific seats, then “Assigned seats” box should be active. In this situation you have to choose seating plan file in SVG format,
prepared accordingly to Seating plans document. If event and venue imply attendance with no specific seats, then you should check “General admission box”. If event has tickets for both assigned seats and general admission
(e.g. dancefloor tickets and VIP seats tickets) then “Combined” seating plan should be chosen
ASSIGNED SEATS
To upload assigned seats seating plan you should click “Choose file” and choose a file with plan data in SVG format, While uploading seating plan Editor checks plan data to ensure its wholeness and functionality and to correct possible errors made during creating a plan, which could be,
for example, missing seats numbering, typos in row numbering etc. When check ends, report window shows up (figure 5).
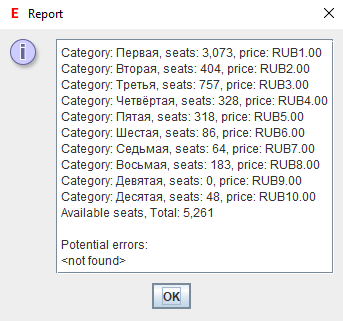
figure 5
In Editor’s report there are real and potential errors. It’s important to compare general number of seats and number of seats in each price category to this data in other documents (invoices, venue plans). If a report doesn’t contain any critical errors, then pressing “OK” will upload plan to the server.
There is a possibility to upload and synchronize SPL seating plan to an open SVG plan if it is necessary.
Seating plan is displayed in “Add seating plan” window (figure 6). To simplify search for possible errors, Editor checks places which it recognized and is ready to upload into platform. These seats are colored grey by checking “Select seats” checkbox. All non-colored seats can’t be uploaded by Editor due to
different reasons and they require correcting (figures 6, 6.1).
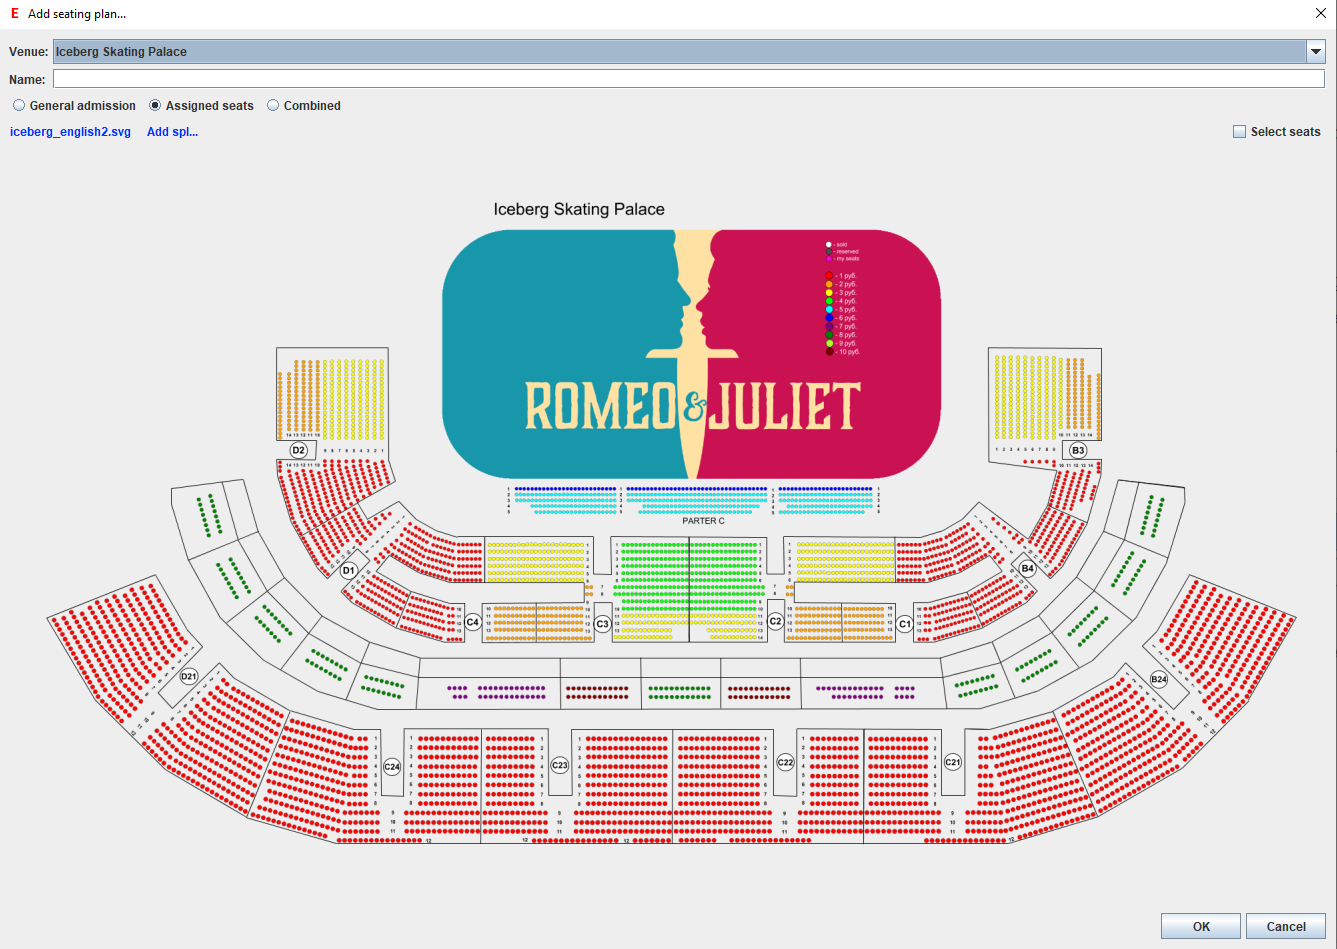
figure 6
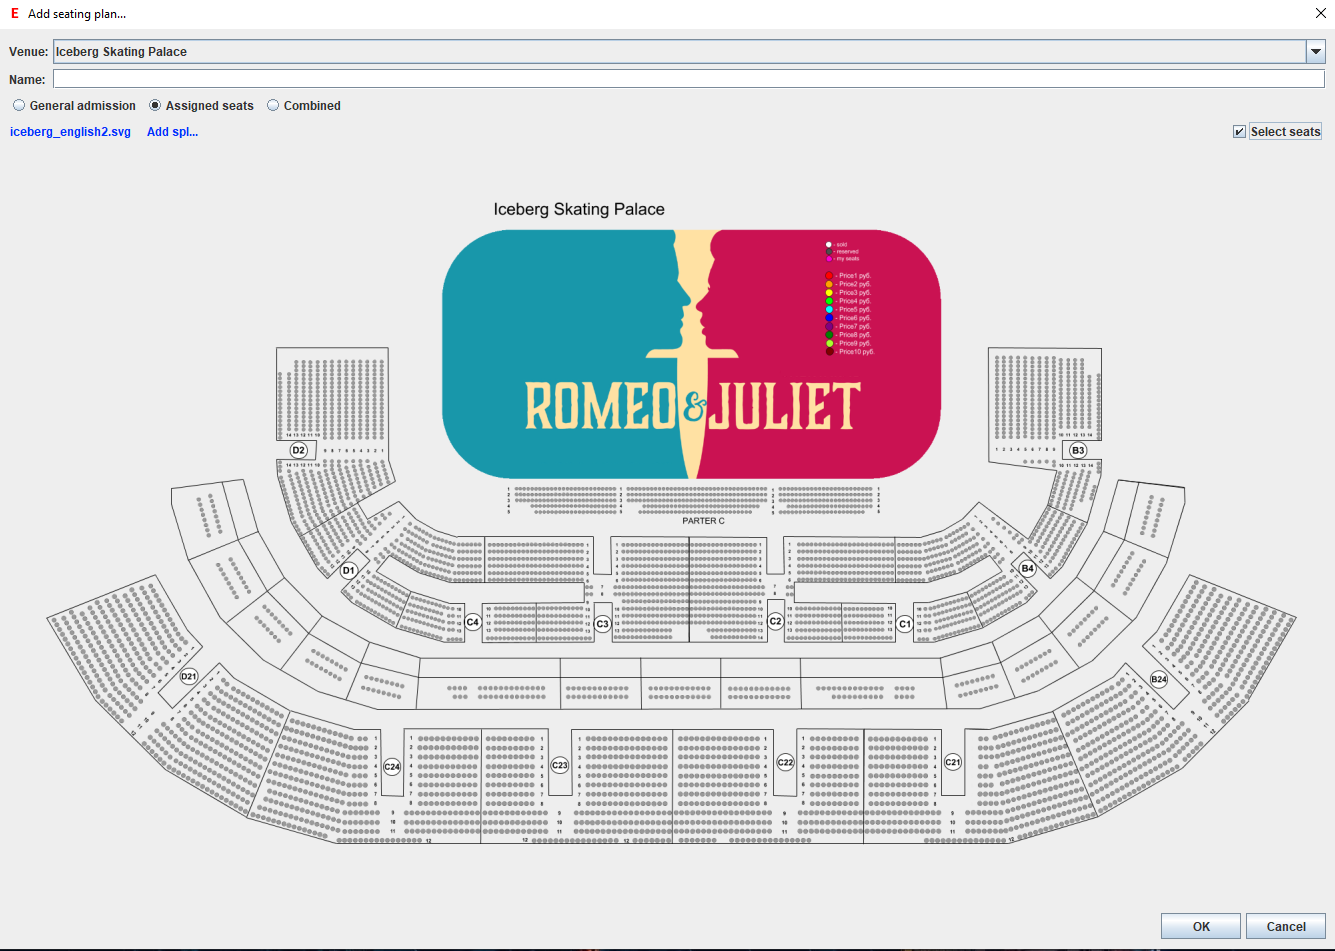
figure 6.1
GENERAL ADMISSION
If performance implies placing viewers not on specific seats, but in general space, then tickets without specified seat information are sold to it. The “general admission” plan variation is just for this situations. If this is chosen, then in a spreadsheet will appear in “Add seating plan” window.
In this spreadsheet you can add price categories by pressing “+”, after which you should input their names and number of seats (tickets) available there as well as price in each category.
And exactly this number is the limit of tickets available for sales in each category.
Recommended maximal length of category name is 20 symbols, spaces included.
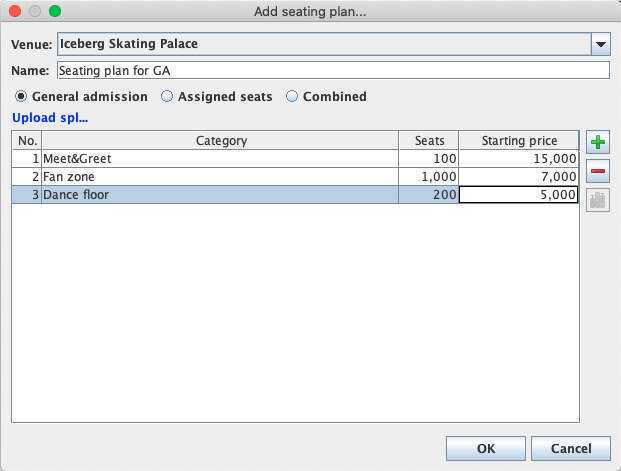
figure 7
By selecting two or more categories “Add restriction” button becomes active, by pressing which you can set the limits of available tickets in selected categories altogether (figures 8, 8.1). This restriction allows limiting of general number of tickets between multiple categories. For example, when selling children tickets and adult tickets for a water excursion you can’t know for sure how many tickets would be sold in each category, but putting limit on both categories in general won’t let selling tickets to more people than ship can handle.
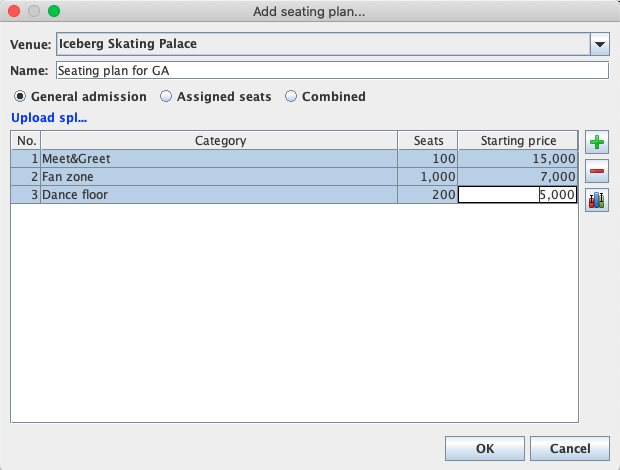
figure 8
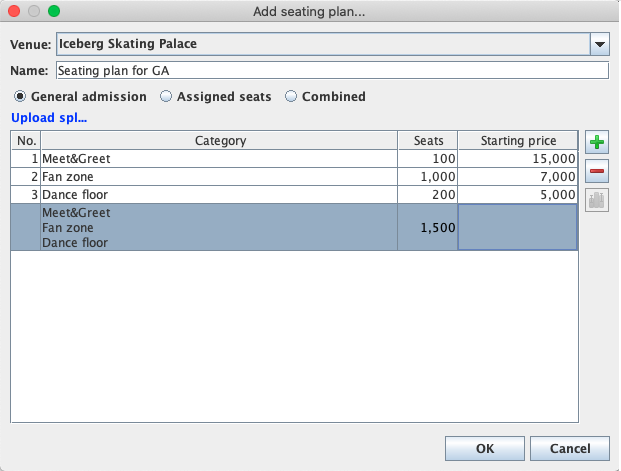
figure 8.1
COMBINED SEATING PLAN
If customer can purchase both tickets with assigned seats and general admission (dancefloor tickets, for example), then “Combined” type should be chosen.
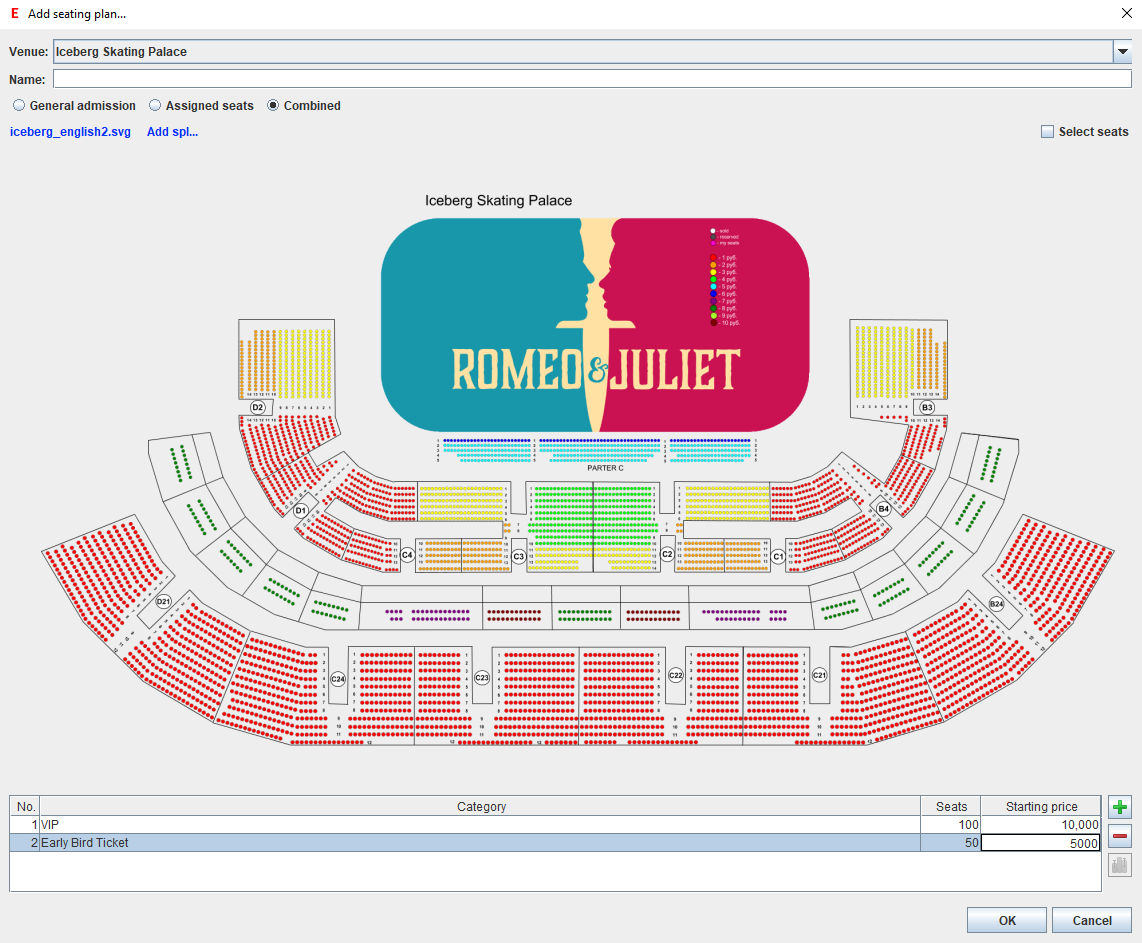
figure 9
Price categories for tickets with general admission should be added to the combined seating plan in addition to SVG file, just like in general admission seating plan.
To add a session, you have to push “+” button (figure 1, p.24). “Add sessions…” (figure 10) window will be opened, where you have to set basic setting for one or multiple sessions.
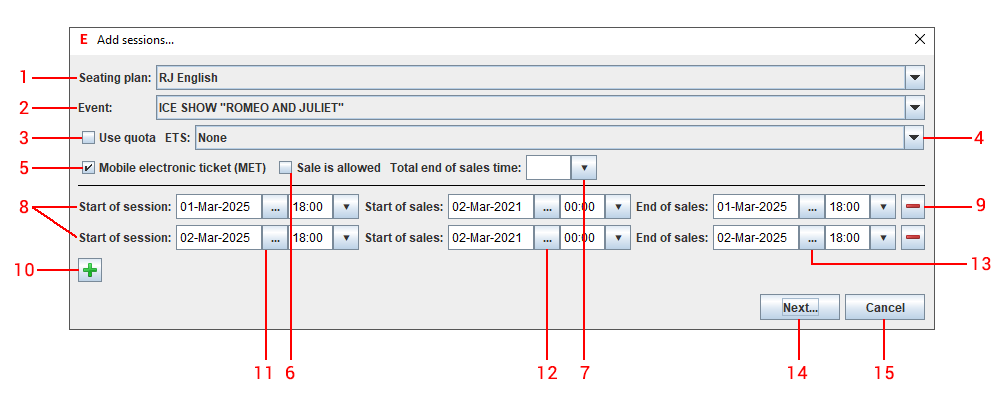
figure 10
1. Session seating plan choice: Seating plan, opened in the left of Editor main window, is chosen by default.
2. Choice of Event, where one or multiple sessions with seating plan chosen in p.1 are created. Event, opened in the right of Editor main window, is chosen by default.
3. “Use quota” checkbox turns on and off the mode of organizing ticket sales via quotas, transferred via invoices. More about this is in Ticket sales organizing.
4. Choice of connection to External Ticketing System (ETS) for creating connection of session added and similar session in ETS. More about this is in Ticket sales organizing and Working with External Ticket Systems (ETS).
5. “Mobile Electronic Ticket” checkbox. If it is active, then “Session attending is available via Mobile electronic ticket (MET) shown on BIL24 mobile app screen (My tickets section)” text will appear in mobile apps (mobile BIL24 frontends).
If checkbox is inactive, then “Ticket will be sent on email.
Make sure to print it to show it on entrance control”. Checkbox works for every session, added in this window. More about this is in Mobile electronic ticket section.
6. “Sale is allowed” checkbox turns on and off ticket sales on added sessions. Checkbox is inactive by default because after creating sessions might have to be done either additional settings, ticket quota adding, or sync with ETS. These actions have to be done with ticket sales turned off.
Checkbox works for every session, added in this window.
7. Total end of sales time in the previous day for all added sessions. Example of using this parameter: in order to meet the restrictions of social distancing during COVID-19 pandemic, visitor access to the museum is organized by selling tickets to sessions starting every 20 minutes. For example, these are sessions on August 5.
Museum administration is required to have ticket sales on these sessions end on August 4, and that there would be no opportunity to buy an entrance ticket on the August 5.
8. Date and time of sessions added. To add sessions button “+” is used (p. 10), and to delete them button “-“ is used (p. 9). All date and time parameters are set in venue’s local time zone.
9. Button of deleting session from the list of being added.
10. Adding sessions button.
11. Date and time of session start.
12. Date and time of sales start. Beginning of the current day is set by default.
13. Date and time of sales end. By default, sales end at the moment of session start. If necessary, sales end can be set later than start of the session.
14. “Next” button, after pressing which, all new sessions data is transferred to BIL24 server, and the object is created in platform, to which lots of data is added.
In this data seating plan is a base, on which session is built. It is not possible to change seating plan in any way after session is created, but you can freely change different session parameters (prices, seat statuses, category names etc.).
There is a limit to total number of seats, added with “+” button (p.10). Total number of seats can’t exceed 50000. Restriction works in the situation, when multiple sessions are added in the same window.
There is no such limit for one session added, which allows to create one session, for example, at the 100000-seated stadium.
This restriction exists in order to prevent user from creating sessions with multimillion seats “in one click” by manual or automation mistakes.
15. “Cancel” button, pressing which cancels any event in the window and closes it.
There are three primary modes of organizing ticket sales through BIL24 platform:
1. Selling tickets from External Ticket System (ETS). To do so, you have to create a session and establish connection between it and similar session in ETS by connecting to ETS. In this case, ETS is the source of all tickets, and other modes can’t be used.
To use this mode, “Use quota” (figure 10, p.3) checkbox have to be inactive, because it allows to choose ETS (figure 10, p.4) and sessions there.
More about this is in Working with external ticket systems section.
2. Selling a quota of tickets, received from promoter by invoices. Tickets are realized and sent back to promoter with invoices registered automatically. To use this mode you have to activate “Use quota” checkbox which will make combobox for choosing ETS inactive.
More about this in Working with quotas section.
3. Selling all seats via BIL24 (without ETS and using of quotas). In this case BIL24 is the source of all tickets sold. To use this mode you have to use setting just like shown in figure 10: “Use quota” checkbox is inactive, no ETS chosen.
Mode choice is critically important for further working with sessions, managing sales, reporting, ticket refunds etc. If third sales organization mode (ticket sales via BIL24) is chosen, than, after pushing “Next” button ) (figure 10, p.14),
“Setting session prices” window will appear (figure 11).
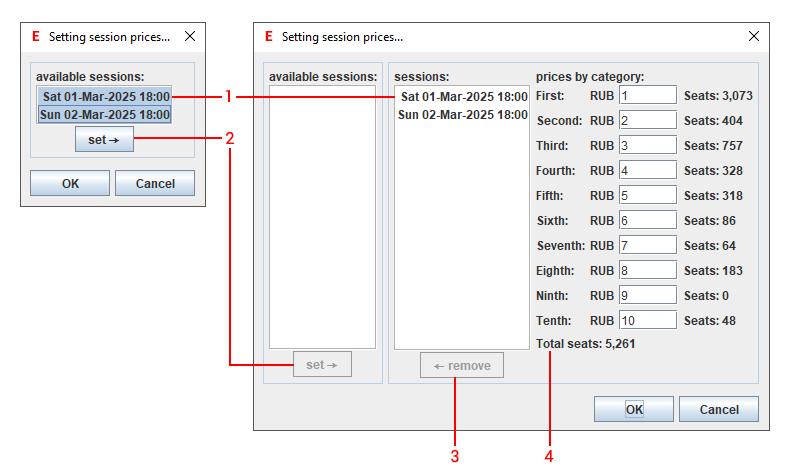
figure 11
If only one session is added, then the window with price settings for this session will be created instantly. If multiple sessions are added, then firstly the window for selecting available sessions will appear, where user can decide, whether they want to set same prices for every session, or different for each session or group of sessions.
Interface is created this way so it’s not necessary to enter same prices multiple times for different sessions. By default, every session is selected in this window (1).
If necessary, one or more, not all, sessions can be selected by mouse clicking. By pushing “set →” button (2) window opens in a different view, where you can set prices according to
categories (4) for sessions, selected in “Sessions” list. By clicking “← remove” button you can separate one or more sessions, move them to the “Available sessions” list and with
“set →” button (2) set another prices..
In modes of organizing through ETS or quotas window “Setting session prices” doesn’t appear. Prices are set by syncing with sessions ETS, or are input from invoices in this modes.
“Manage seats” window with selected session data is opened by clicking (25) button on figure 1. In this window (figure 11.1) event organizer can control all the seats in selected session, their statuses, prices, sync with ETS etc.
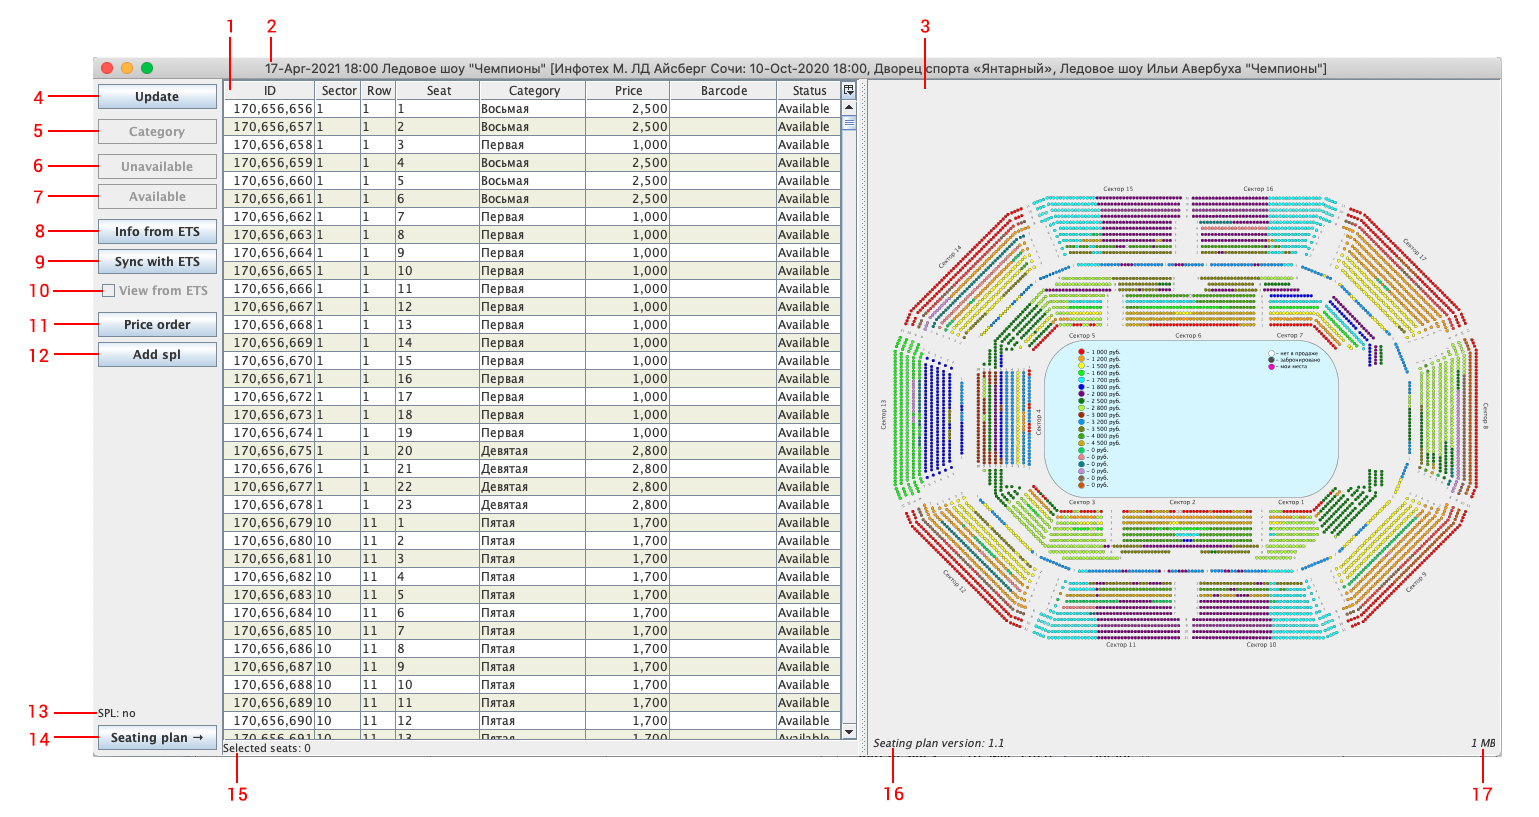
figure 11.1
1. Window’s header contains name of an event and short session data: seating plan name, date and time of start, connection to ETS data (if present).
2. All seats on the plan are displayed in the form of “Seats spreadsheet”. In this spreadsheet user can select any number of seats to perform various events with them. Selected seats are displayed on the plan (3). Total number of seats selected is displayed below spreadsheet (15).
Spreadsheet can be sorted by any column by clicking on its header.
3. Venue seating plan displays seats graphically. Bottom left corner contains plan’s version and type (16) and bottom right corner contains its size in Mb (17). Users can select groups of seats on the plan, and they will also be selected in the spreadsheet (2).
Keys combinations are used for selecting:
Right-click – selection of a seat
SHIFT + Right-click- selection of a row
ALT + Right-click – selection of a sector
CTRL + one of the above – adding to selection another sector/row/seat or removing selection from already selected ones.
To enlarge plan you can use mouse scroll, when cursor is placed above the plan (figure 11.2). To return to default plan size you should click mouse wheel once.
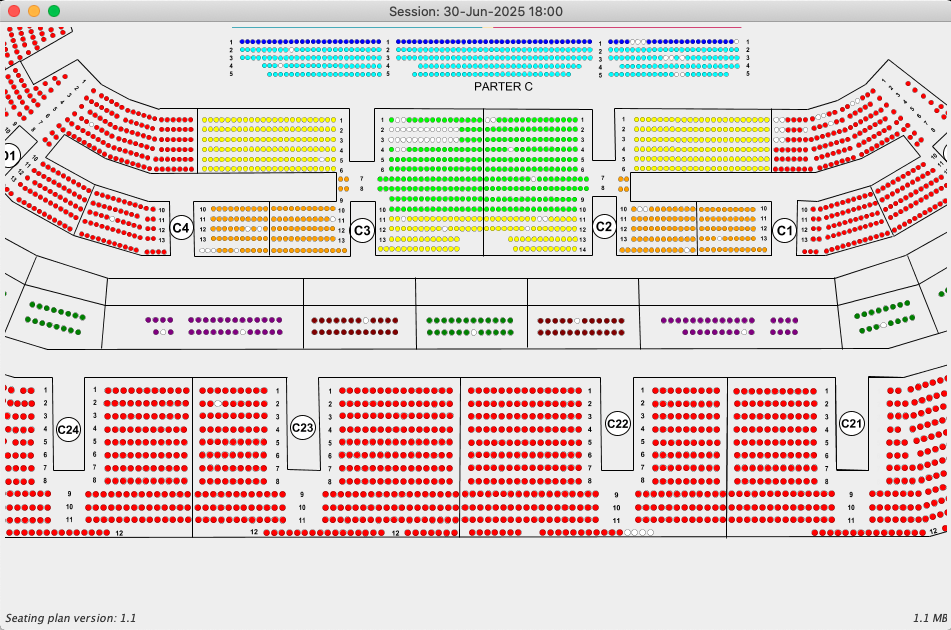
figure 11.2
4. If you press “Update” button, Editor will receive latest session data from BIL24 central server.
5. “Category” button is available, if any seats are chosen. Pressing the button opens window where price category of selected seats can be changed.
6. “Unavailable” button allows to remove selected seats from sales by setting for them “Unavailable” status. Button is active, is seats with “Available” status are selected.
7. “Available” button allows changing the status of unavailable seats to “Available”.
8. “Info from ETS” button is available, if session is connected to session in ETS. Button allows receiving additional session data from ETS. More about this is in Working with ETS section.
9. Sync with ETS” button is available, if session is connected to session in ETS. Pressing the button launches process of synchronization session in BIL24 with session in ETS. More about this is in Working with ETS section.
10. “View from ETS” checkbox controls the display of seating plan (3). If checkbox is inactive, then plan contains seats’ statuses received from ETS. If not, then seats’ statuses from session in BIL24 are shown.
11. “Price order” button sets an order of prices displayed to a customer during showing a plan to them (figure 11.3).
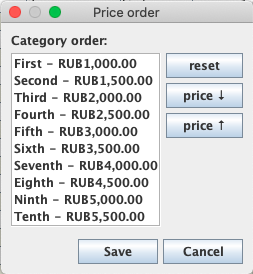
figure 11.3
12. “Add SPL” button allows adding to plan in SVG format a plan in SPL format.
13. Indicator of presence of a plan in SPL format added.
14. “Seating plan ->” button separates plan from session window (separates in two windows) and vice-versa.
15. Number of seats selected.
16. Version and type of the plan.
17. Plan size in Mb.
WORKING WITH EXTERNAL TICKETING SYSTEMS (ETS)
An ability to sell tickets on event sessions, created in External ticket systems (ETS), is especially demanded by TixGear users. ETS interacts with TixGear through gate, where ETS’s API or protocol is realized. Main goal of interacting with ETS is choosing and reserving seats, selling and refunding tickets, source of which is ETS. Gate in ETS is a software component realizing functional, necessary to operate with this specific system. >.
Connection to ETS is a specific Gate realization for a specific Event Organizer, with specific account data: username, password, keys, identifiers etc. Event Organizer receives this account data from Promoter, who uses one of ETS having gate in BIL24.
In order to sell tickets from ETS you have to:
1. Enter with a contract with Event Promoter and receive account data to establish connection with ETS. Fill in and send request for ETS connection.
A connection using this account data is then created in BIL24.
3. Create event sessions, then synchronize them with similar sessions in ETS.
Connection between sessions in BIL24 and ETS is established in “Add sessions… window (figure 10), which appears after clicking “Add sessions” button (figure 1, p.24).
Let’s consider an example of working with ETS the concert “Spartak Time” from ticket system “Infotech Samara State philharmonic).
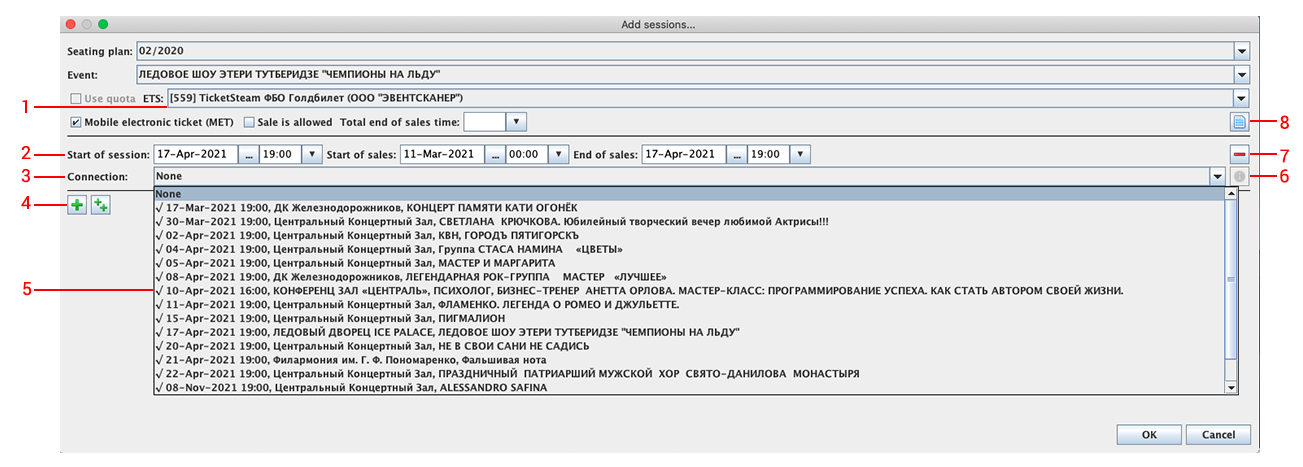
figure 11.4
1. A line with selected connection to ETS, owned by event organizer “KASSIR.RU LTD – NBO”.
2. Date and time of session start, date and time of sales end. These parameters are applied automatically, based on session data from ETS.
3. “Connection:” combobox creates a connection between session created in BIL24 and session in ETS.
4. Adding session from ETS button. In this window you can add multiple sessions from ETS at the same time.
5. Name and data of session in ETS. For ticked sessions there already exists a connection with a session in BIL24.
6. “Info from ETS” button opens window with data (additional information), received from ETS. This data is presented in text and can be used for analyzing and for more precise synchronization of a session in BIL24 with session in ETS (figure.11.5).
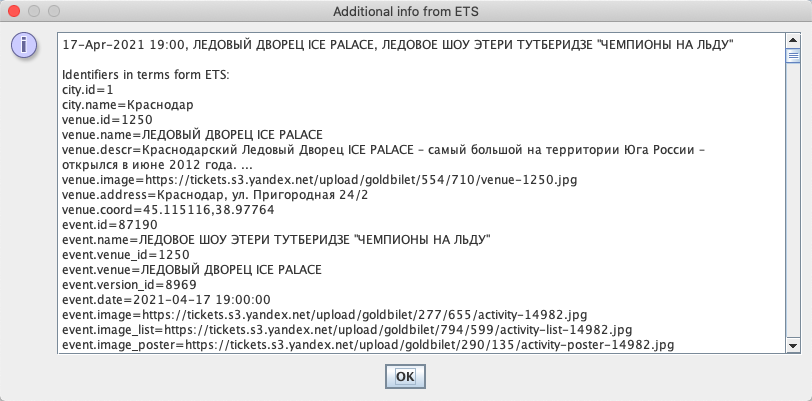
figure 11.5
7. Button for deleting a session from list of sessions added.
8. “List from ETS” button opens window with a list of all sessions available for this connection (figure 11.6).
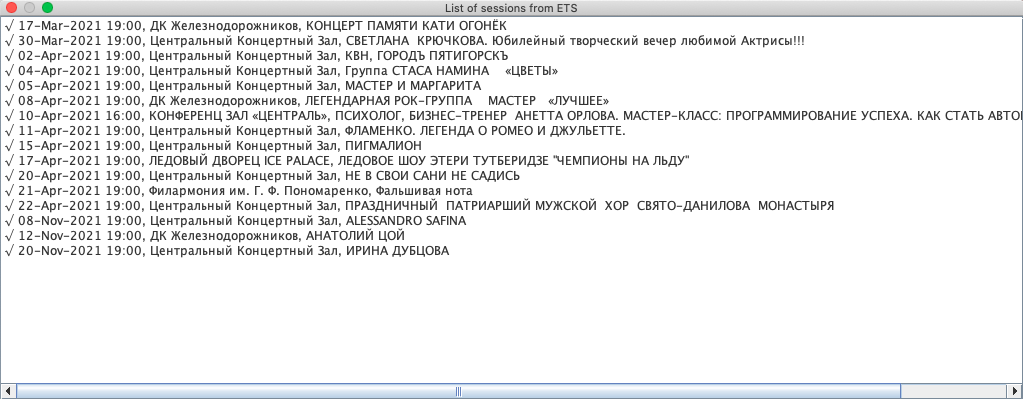
figure 11.6
9. Button for deleting a session from list of sessions added.
After deleting a session, connected to ETS, it is necessary to open “Manage seats” window (figure 1, p.25) and perform primary synchronization of session in BIL24 with session in ETS (figure 11.1, p.9).
Synchronization is necessary for establishing precise matching between every seat on BIL24 seating plan and seat in list, received from ETS. For an assigned seats seating plan, while establishing matching, there is check of seat coordinates
(sector, row, number), and, if they are exactly the same, seat in BIL24 receives same price category as in ETS. Price categories and other session parameters are also synchronized by unique identifiers (ID). Changing ID in ETS disrupts synchronization,
because BIL24 can’t match parameters of existing session with parameters of ETS session. While synchronizing sessions with general admission seats are matched by price categories (names of price categories in BIL24 and ETS have to be the same).
After completion of synchronization process, report is show to user (figure 11.7):
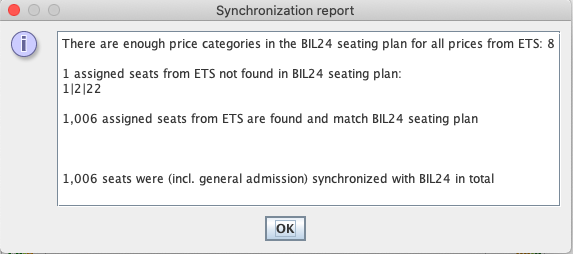
figure 11.7
It is necessary to carefully inspect synchronization report, and, if needed, make changes in seating plan, correct inconsistences both in BIL24 and ETS. After adding a session, connected to ETS, line with a link to session plan (figure 1, p.33) will appear in Editor main window. Clicking it will result into request to ETS and current state of seating plan with seats statuses and prices will be opened in default web browser.
This plan in BIL24 standard is displayed to customers during their visit to website or opening session in mobile app, if agent uses tools of ticket platform.
Request to ETS is performed to create a plan, in order to receive most precise and actual data and seats’ statuses at that very moment.
Connected to BIL24 client ticket systems use their own seating plans and sales toolkit and renew information about seats statuses on their own. On each request of getting statuses from ETS, BIL24 platform analyzes discrepancies of its data with ETS data.
If at least one seat is not being sold because of price discrepancies, seat coordinates not matching, not matching name of general admission category, changing of seat identifier (general admission categories) in ETS, then session is added to the list of
sessions with seats discrepancies (figure 1, p.49). This list contains number of seats with seats discrepancies in all reasons listed above.
Sessions in this list can be synchronized manually. Few times a day BIL24 synchronizes them automatically. Presence of BIL24 session and connected to it session in ETS allows managing seats and sales from BIL24 Editor.
Currently, to divide Agents’ access to sale actions “Subscriptions” window is used (figure 30). Further, after full implementation of BIL24 User Architecture, agents will be able to “subscribe” to Organizers’ events independently by mutual agreement.
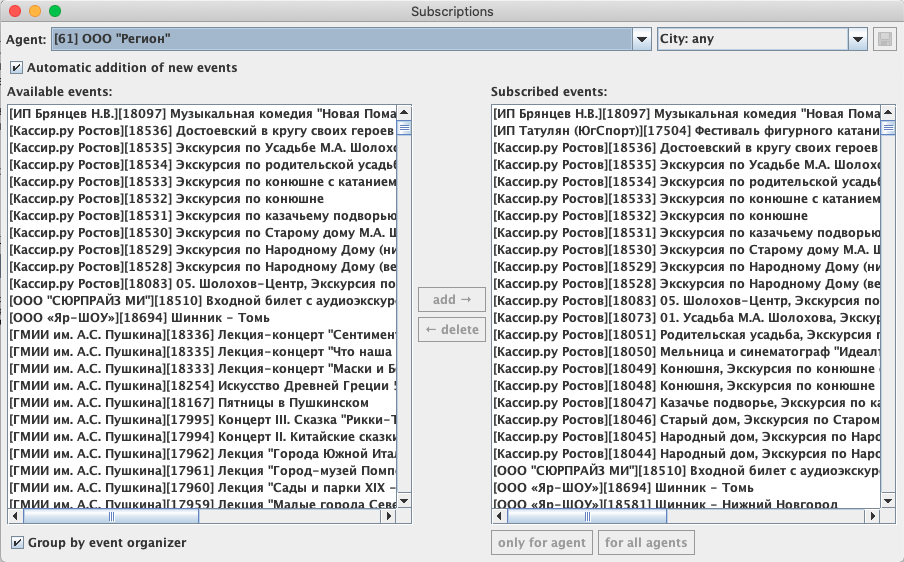
figure 30
When creating an event, it becomes available for all agents and gets into their “Subscribed events” list, meaning ones, that can be sold by an Agent. In most cases it should be like that and there is no need to open “Subscriptions” window and change anything.
But sometimes, one or more events are not meant for all, but for one or multiple Agents. In this case you should open “Subscriptions” window (figure 18), choose an Agent, select events in “Subscribed events” list and press “only for agent” button.
Events will be automatically removed from all other Agents and will be available only for selected agent. If it’s required to make event available for one more Agent, then you should select this Agent. Select event in “Available events” list and press “Add” button.
This way you can make events available for one or multiple Agents. These manipulations better done when “Sale is allowed” checkbox for these actions is inactive (to avoid unauthorized sales). Using “Add” and “Delete” buttons you can add and delete events to and from
“Subscribed events” list of any Agent. To make selection of events more comfortable “Group by event organizer” checkbox can be used. If it is active, then “Available events” and “Subscribed events” lists will have Event Organizer name and Action ID placed at
the beginning of each string in square brackets. It will allow an easy selection of all Organizer’s actions, using SHIFT or CTRL while mouse-clicking.
Nowadays most of electronic tickets purchasers prefer to not print them on paper, but to show them during entrance control on mobile device screen. To do so, it’s convenient to purchase tickets through Main Mobile Application BIL24 (MMA) for Android and IOS. Purchased tickets are displayed in MMA as Mobile Electronic Tickets (MET). To show them on screen, you should open “My tickets” section (figure 31).

figure 31
Any number of tickets can be selected by swiping right. Selected tickets can be sent to an email. It is convenient when viewers don’t enter together and each one can show their own ticket from their own mobile device.
Ticket can be hidden by swiping left.
Tickets are displayed on separate panels, containing barcode and brief ticket data. Pressing the panel opens ticket for detailed view (figure 31.1).

figure 31.1
Pressing “Show tickets as QR-codes” (figure 31) will display tickets as a sequence of QR-codes (figure 32), which is convenient to quickly check large number of tickets.

figure 32
In BIL24 platform customers receive access to purchased tickets on every resource right after email confirmation. If tickets are bought from one of BIL24 agents, then after purchase they will also be available in MMA too (figure 33).

figure 33
Organizer can inform customers about an ability to use MET. Checkbox “Mobile Electronic Ticket” (figure 1a, p.39 and figure 10, p.4) exist for these needs. If it’s active, then in mobile apps (BIL24 mobile interfaces) “Mobile Electronic Ticket (MET) can be used to enter, which is shown through BIL24 Mobile App screen (My Tickets section)” text will be displayed in action description. In checkbox is inactive, then “Ticket will be sent to the email. Make sure to print it to show at the entrance”.
Editor’s Console is used for detailed user informing about app performance. Double-clicking button (figure 1, p.41) opens console window (figure 34).

figure 34
Console window is modal and opens over all windows. Window contains text field with messages from an app, BIL24 central server, External Ticketing Systems etc. Window has the same type in each of platform apps. Upon launch, name and version of OS and Java are written into console. It is recommended to use 64-bit version of Java. Data of commands execution, information regarding number of loaded actions and sessions are all also written in console.